
In July 2022, I acquired a brand new {custom} camper van – a 4×4 Sprinter Van conversion constructed out by Outdoors Van in Portland, Oregon. That is my third Sprinter camper van since 2016, and over time I’ve discovered rather a lot from every van construct about what works and what doesn’t. I’ve discovered the professionals and cons of getting a toilet, the significance of getting sufficient storage for large AND small gear, and I’ve gotten to experiment with three completely different layouts which supplies me a number of perspective to share with you right here.
On this weblog publish, I give a full tour of the design, structure, and materials decisions in my new van and the way it compares to my earlier Sprinter Van conversions. I additionally share extra particulars about why I made a decision to change up my flooring plan and embody an Outdoors Van overview of my total expertise.
Watch the complete video tour of my third Sprinter Van conversion right here!
My Earlier Sprinter Van Conversions
Again in 2015, I had not too long ago launched my weblog and was doing a number of solo journey within the Western US. On the time, I used to be touring out of my Subaru, however after a creepy expertise tenting in Nevada, I made a decision I wanted a car that I’d really feel safer sleeping in. I additionally wished a car that I might extra effectively work out of since my new profession path as a full-time blogger had me spending a number of time on the street. That led me to the Sprinter Van.
My First Sprinter Van Conversion
My first 144″ Sprinter Van was constructed by an inexperienced builder in southern California and had a full indoor lavatory, an open aisle all the way in which to the again doorways, and a convertible couch mattress throughout from the slider door.

In some cases – notably once I was solo on shorter journeys – this van labored nicely. Nevertheless, I discovered myself by no means utilizing the toilet, wanting a extra devoted workspace, and needing extra indoor storage for tenting gear and my bike.
As well as, I discovered rather a lot about supplies, the significance of constructing mild, and having weight correctly balanced throughout the van. This van construct included heavy supplies like tile and reclaimed barnwood – each of which appeared lovely, however when it got here to driving off-road, issues weren’t as sturdy as I had hoped. Since I wasn’t loopy concerning the structure or the construct high quality, I offered that van and discovered some exhausting, costly classes within the course of.
Watch the full video tour of my first Sprinter Van right here:
My Second Sprinter Van Conversion
In 2017, I employed the respected Portland-based van conversion firm Outdoors Van to construct me a 170″ Sprinter Van conversion. With the longer wheelbase, I had extra room to include a everlasting platform mattress, a dinette for working and consuming, and a spacious galley. I additionally wished to depart some open area within the doorway since we do van life with two canine.
I had this second van for 4 years and drove it almost 70,000 miles. The standard of my second Sprinter Van conversion was worlds above the primary. The van was able to driving virtually anyplace because of the sturdiness of the conversion. The battery system was additionally extra sturdy and allowed me to remain off-grid for so long as I wished.
Watch the video tour of my second Sprinter Van conversion right here:
My Third Sprinter Van Conversion
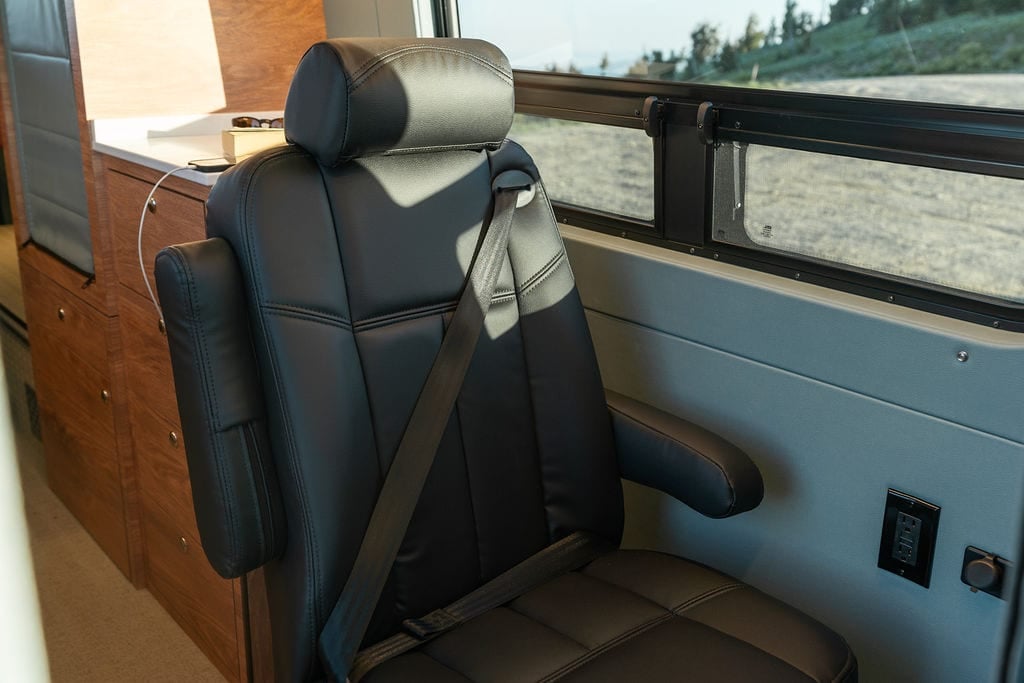
After 4 years and almost 70,000 miles, I made a decision I wished to experiment with a brand new structure. Additionally…shock! Our household is rising….child bear is due February 2023, so we would have liked one other seatbelt which is the first motive for this new van.
I went again to the drafting board with Outdoors Van to construct out a brand new 2021 170″ 4×4 Mercedes Sprinter Van with a design that centered on incorporating a 3rd passenger seat, extra storage to maintain the muddle at bay, an upgraded lithium battery system, in addition to most of the options I cherished in my second van, like the massive galley and platform mattress.
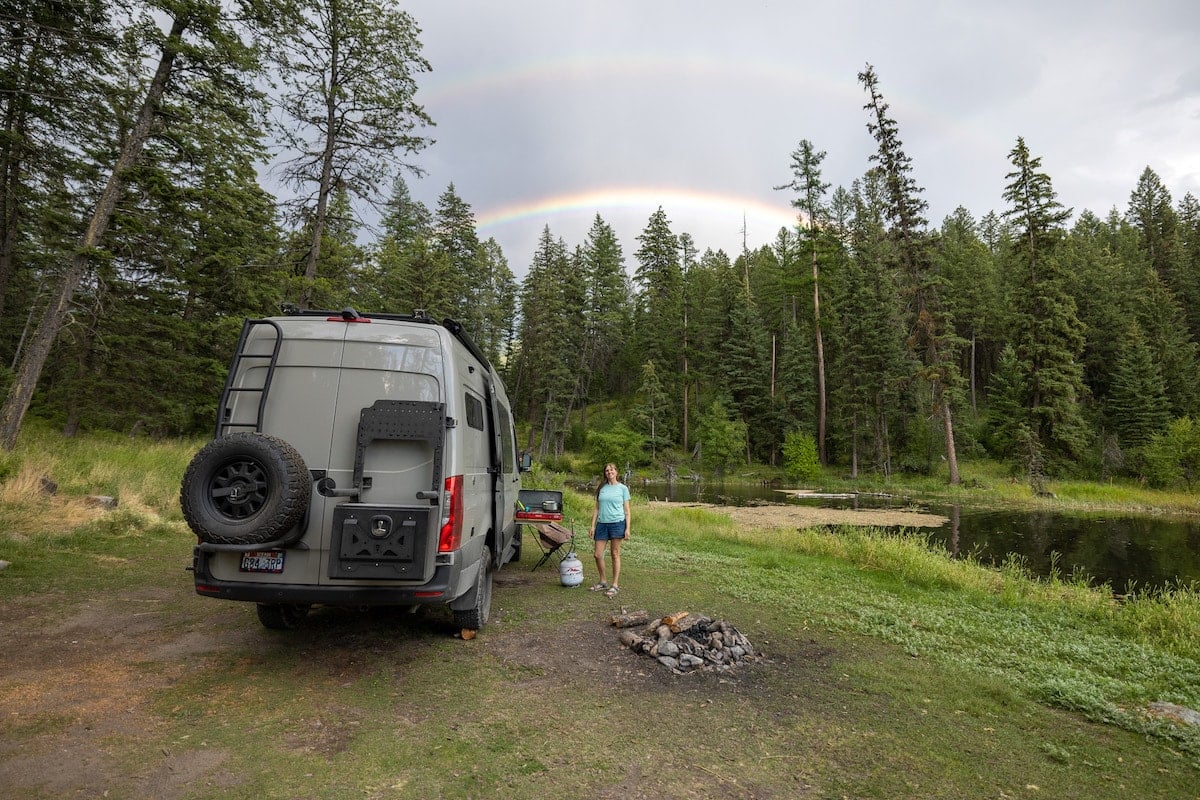
We sometimes spend 6-8 months a 12 months dwelling full time in our van, and my new Outdoors Van turned out superbly with many {custom} options that had been designed to accommodate van life with a household of three plus two canine for prolonged intervals of time. I additionally work from the van so having a cushty work area was key.
With including a 3rd passenger seat, we did lose a few of our open area so freely shifting concerning the van takes a bit extra finesse. Nevertheless, we gained much more storage for all the small issues which has dramatically helped enhance our group.
Now that I’ve spent a while on the street in my new Outdoors Van, I’m prepared to enter the main points.
Missed the video tour within the introduction? You possibly can take a full tour of my third Sprinter Van conversion right here on my YouTube channel.
4×4 Mercedes Sprinter Chassis
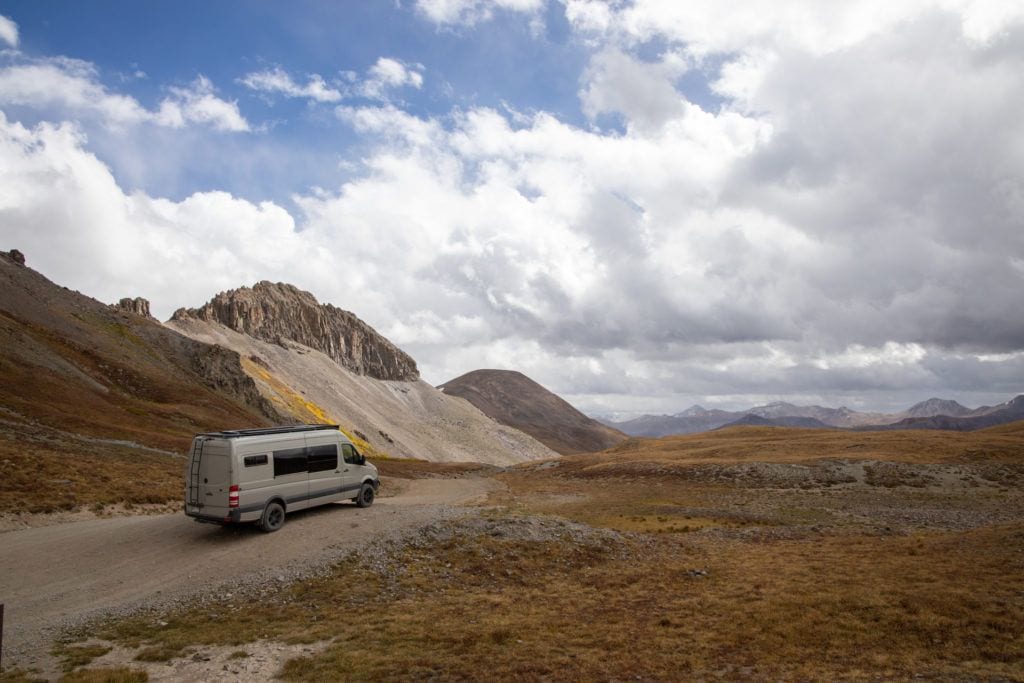
I selected a Mercedes Sprinter Van as a result of in 2021 once I bought the chassis, it was the one panel van available on the market that supplied 4×4 with satisfactory clearance for off-road driving. The Ford Transit has an all-wheel drive mannequin, however the Sprinter Van has almost 2″ extra of floor clearance, which was vital to me for its off-road capabilities.
My third Sprinter Van is the very same chassis as my second, which we had been actually pleased with and fortunately encountered only a few points with. My accomplice Ryan and I’ve pushed over rocky 13,000 foot passes in Colorado, chased powder, camped off tons of of grime roads, and extra. Over the course of 4 years, the Mercedes 4×4 Sprinter allowed us to journey almost in all places we wished to go, proving itself to be one unimaginable beast. For these causes, I selected one other Sprinter.
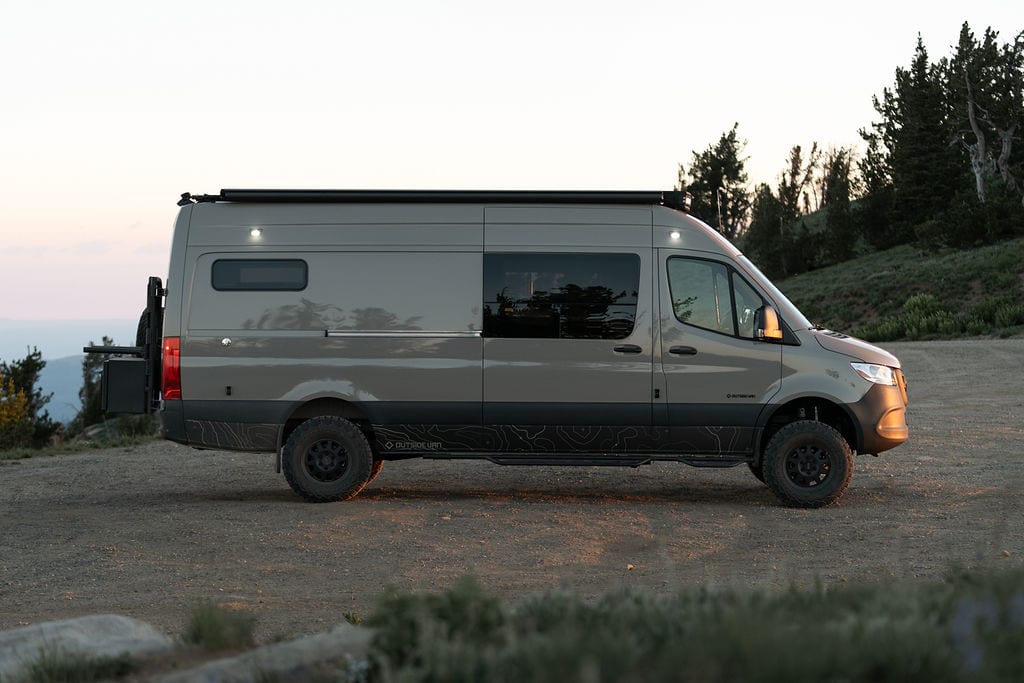
My third Sprinter Van is excessive roof cargo 2500 170″ wheelbase, once more the identical as my final van. The 170″ provides us loads of room to stay comfortably for 6-8 months at a time, and retailer all of our gear with out feeling cramped with two canine. I’ve written a comparability of the 144″ vs 170″ wheelbase and the execs and cons of the completely different van chassis for those who’re making an attempt to determine what car is correct on your van conversion.
Why I selected Outdoors Van for my Sprinter Van Conversion
For those who’ve been following me for some time, I acquired burned on my first Sprinter Van conversion. I employed a “van builder” primarily based on some fairly pictures I noticed on Instagram with out actually doing my homework on their background or expertise.
Seems, the man talked speak however didn’t actually know what he was doing. I used to be left with a model new van construct riddled with points – corresponding to a leaky bathe flooring, warped cupboards, and defective wiring for my photo voltaic panels. These issues took me months to take care of, which definitely wasn’t the introduction to van life I used to be on the lookout for.
For my second conversion, I wished to work with knowledgeable van conversion firm that had a number of expertise, a superb popularity, and will construct me a van that was made to go off-road. Throughout that point I met a fellow van lifer in a car parking zone in Moab who had a Sprinter transformed by Outdoors Van and had nothing however good issues to say.
This time I deliberate to do my analysis, so I scheduled a visit to Portland to tour their facility, and it was clear that Outdoors Van was a high notch operation. After interviewing numerous different fashionable firms, I made a decision Outdoors Van was going to be the most suitable choice for my second {custom} van.
Through the years, we put that second Sprinter Van to the check, driving her over a few of the roughest roads the chassis might deal with in Colorado, together with Cinnamon Go and Stony Go.
After 70,000 miles, my cupboards and drawers labored precisely as they did on day 1, proving the construct to be extraordinarily sturdy. I by no means had any points with my electrical or different methods, and the van functioned precisely as promised.
I by no means felt held again by my van, which is the way in which it must be for those who’re dropping cash on knowledgeable van conversion. Additionally once I went to promote the van in late 2021, I used to be in a position to get high greenback for its resale. That is why I employed Outdoors Van as soon as once more for my third Sprinter construct.
No matter what firms you might be contemplating, I extremely advocate you learn this publish that can assist you display screen and select the best van builder. There are such a lot of unqualified individuals on the market able to take your cash, and I’d hate to see you get screwed like I did the primary time round.
And for full disclosure…Outdoors Van is now considered one of my model companions, they usually had been considered one of my title sponsors at Open Street Fest.
Customized Sprinter Van Conversion Particulars –
Sprinter Van Partitions
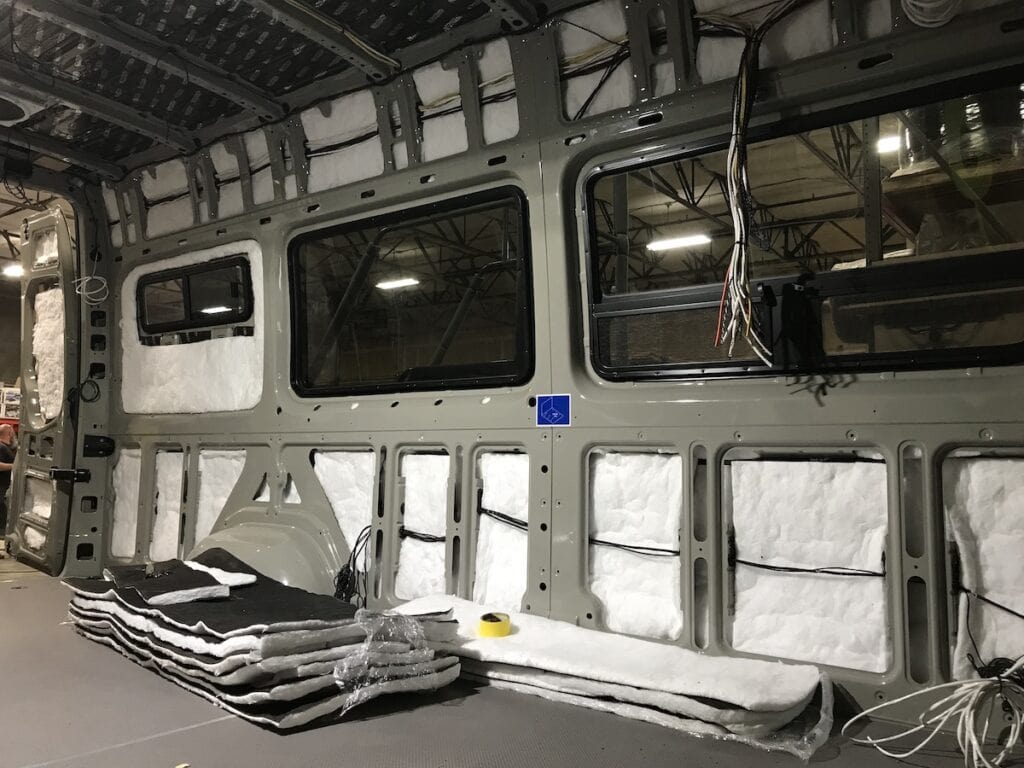
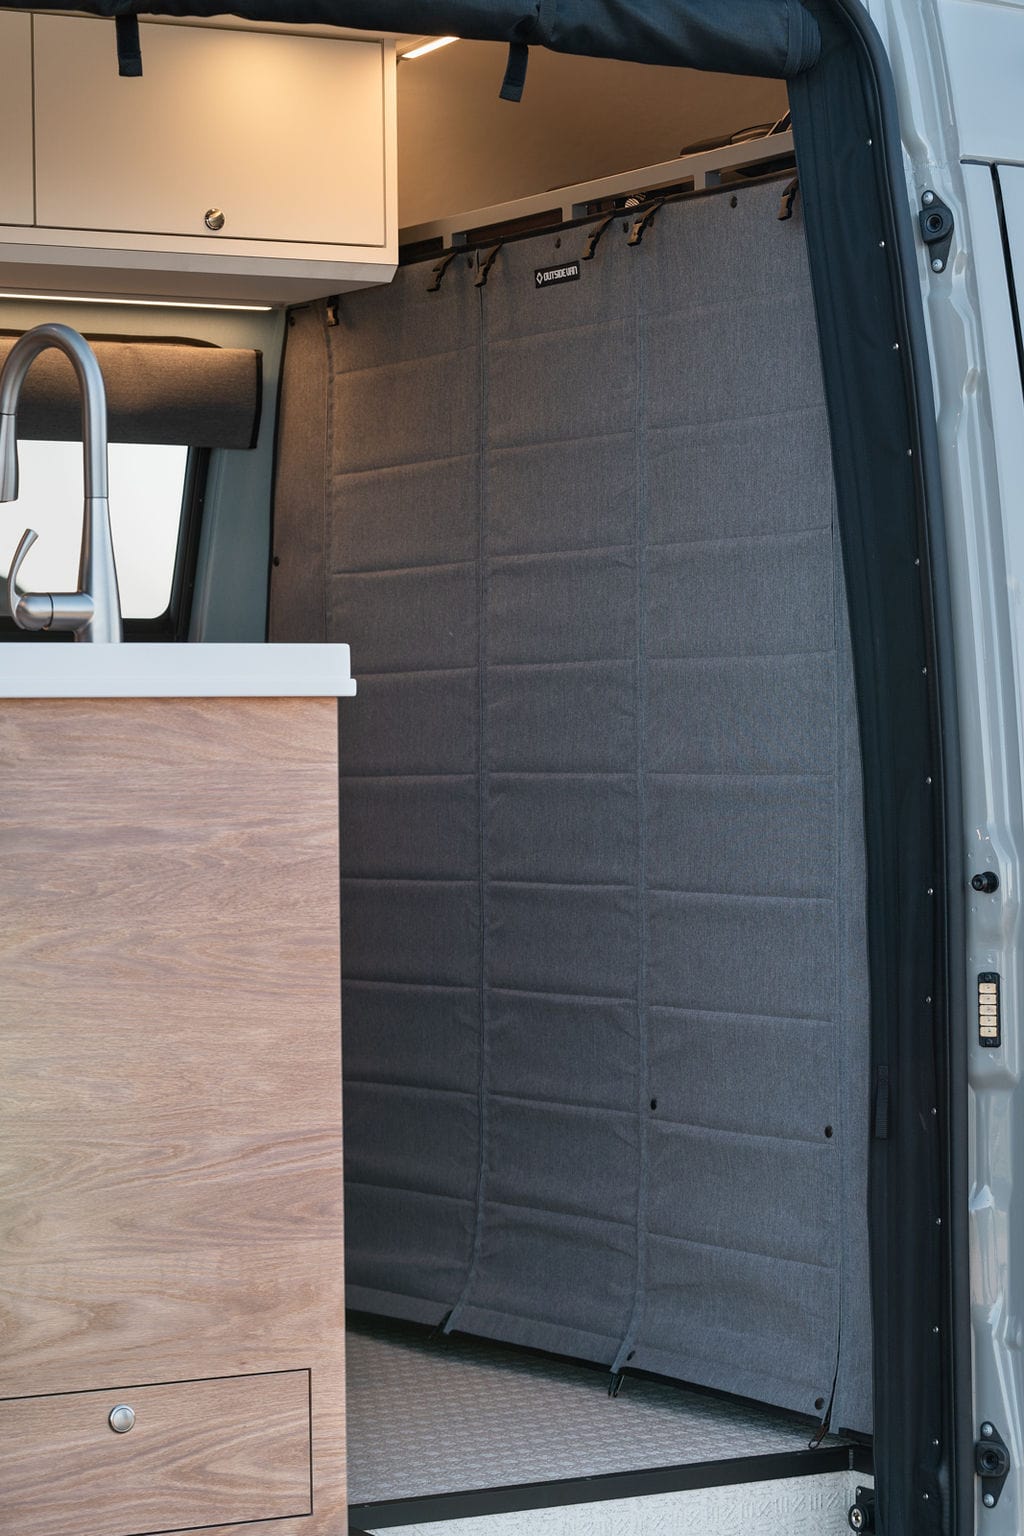
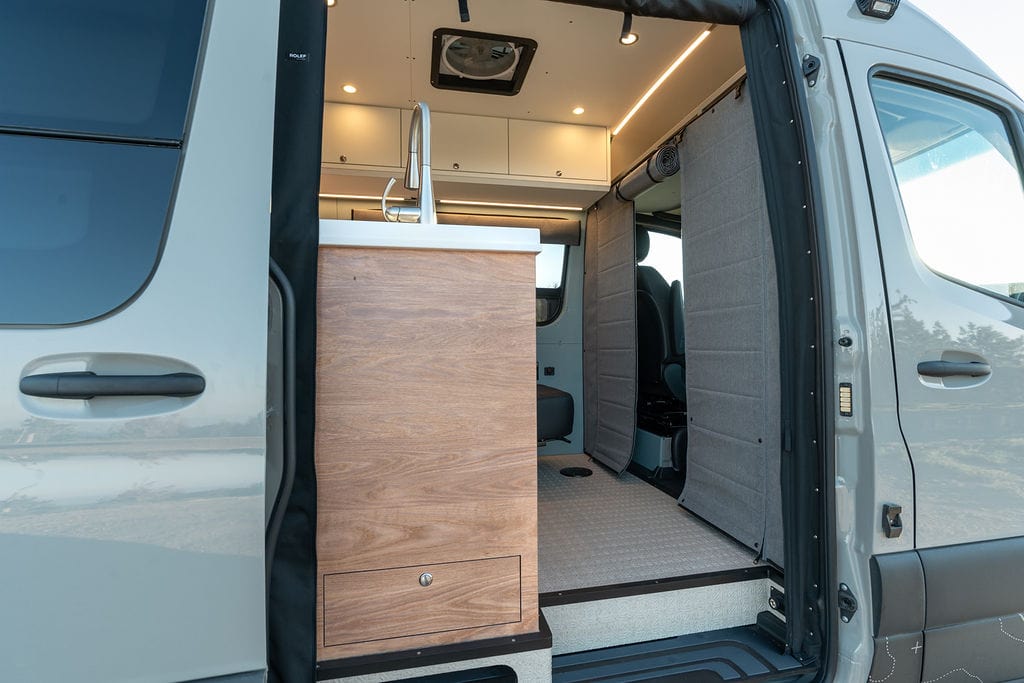
The partitions in my Sprinter Van conversion, together with the closet door proven under, are made out of Sileather. Sileather is an artificial, eco-friendly materials that’s vegan, VOC-free, and fade proof. The perfect half is it’s waterproof and with the intention to clear it, you simply must wipe it down with a humid fabric – even bloody mosquitos wipe proper up. It’s excellent for individuals with canine, as canine hair doesn’t persist with it. I additionally used Sileather in my second van…that’s how a lot I favored it.
Behind the partitions you’ll discover insulation, a extremely highly effective sound dampening materials, and a {custom} infrastructure that Outdoors Van has developed to scale back the twisting and flexing of the van inside, making the construct extra sturdy. The van is extremely quiet once I drive. There are not any rattles or different noises from the cupboards or different parts, making for a really peaceable trip.
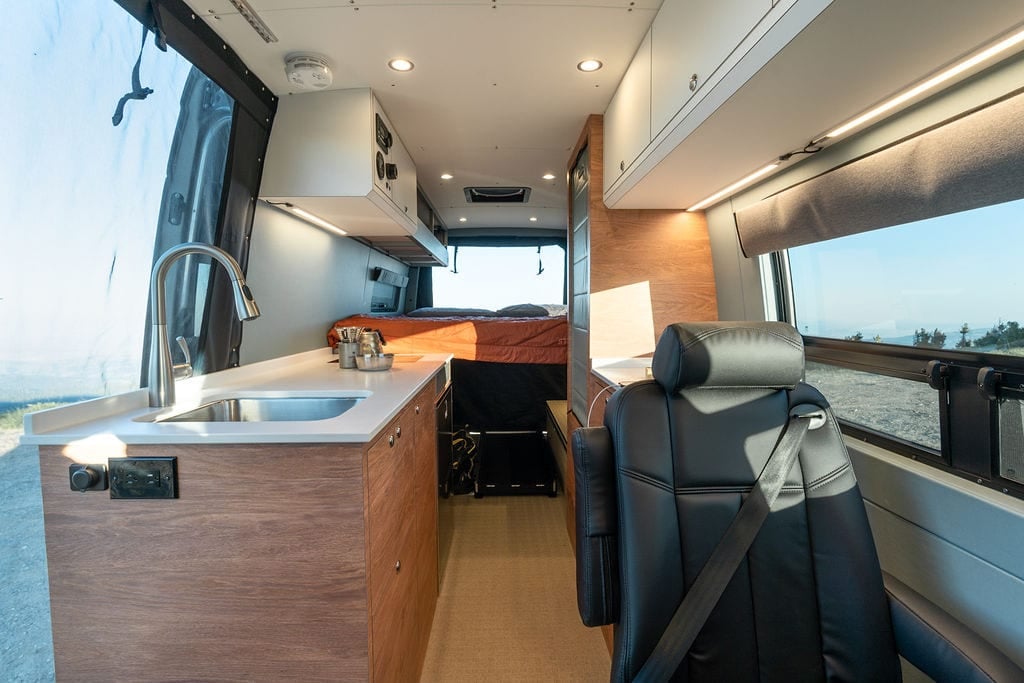
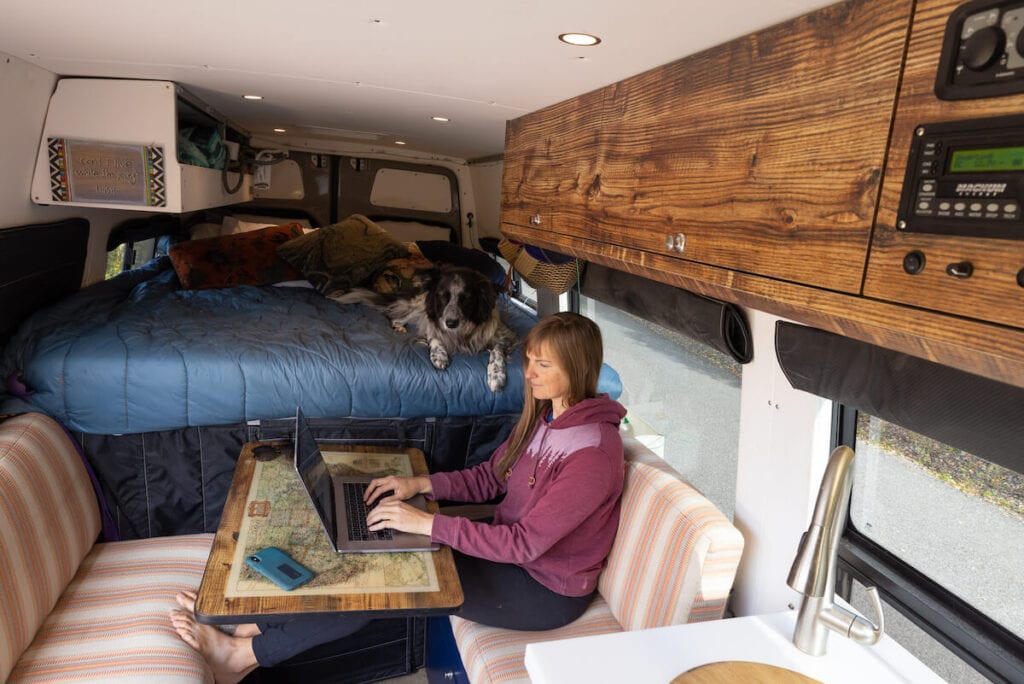
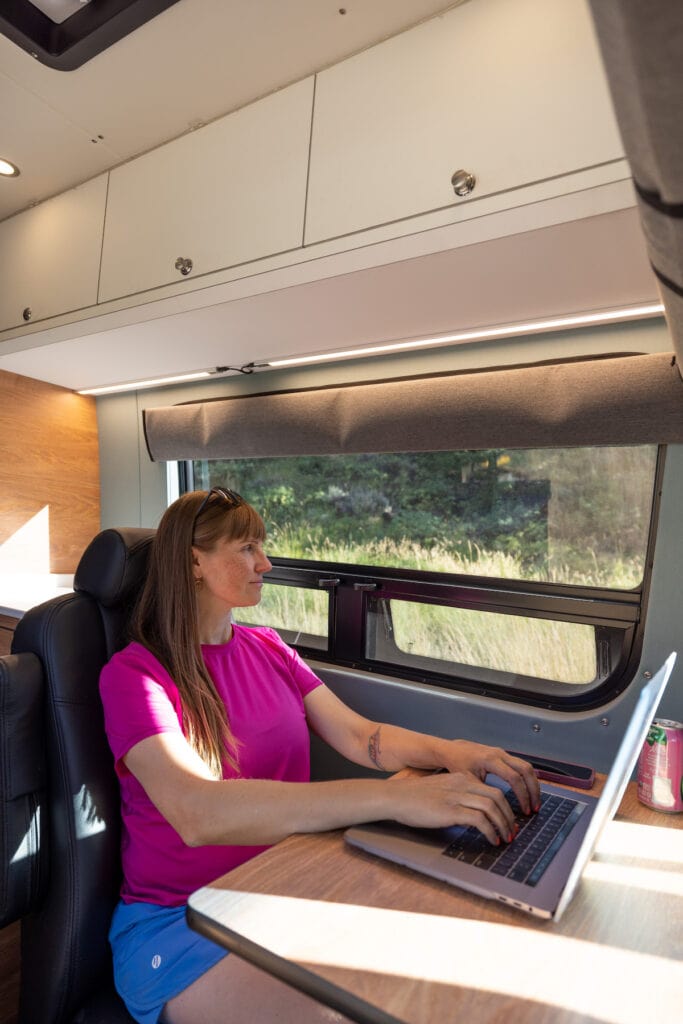
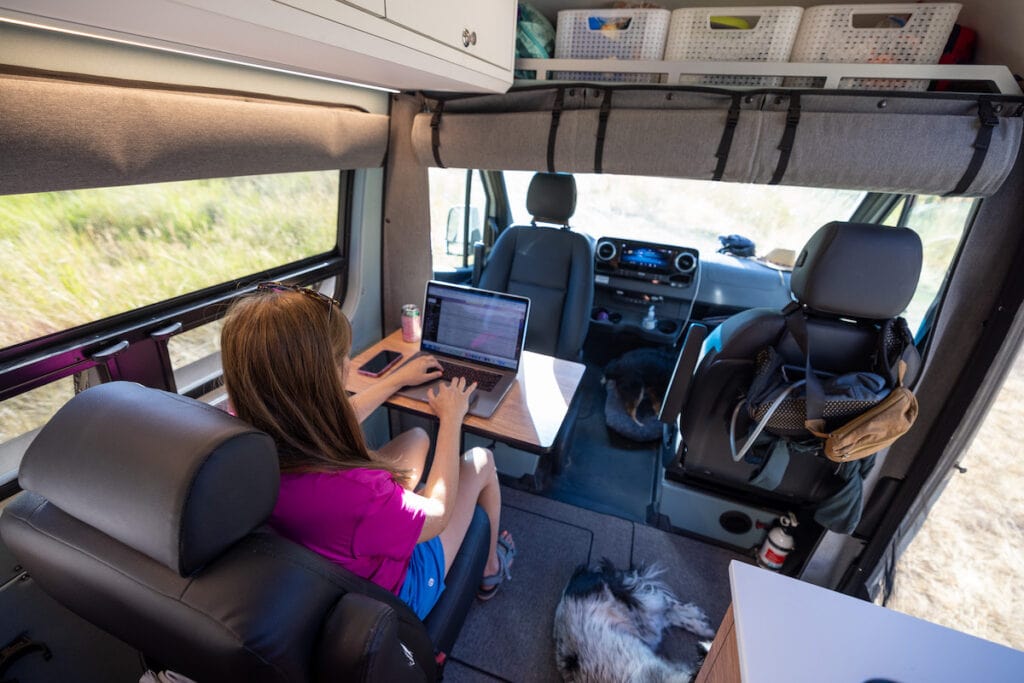
Sprinter Van Seating Space & Workspace
In my second Sprinter van conversion, we had a dinette with a Lagun desk simply in entrance of the mattress. This was my major workspace and likewise the place we ate our meals. I cherished having this devoted workspace, and the Lagun desk labored completely as we might simply swivel is out of the way in which when it wasn’t getting used.
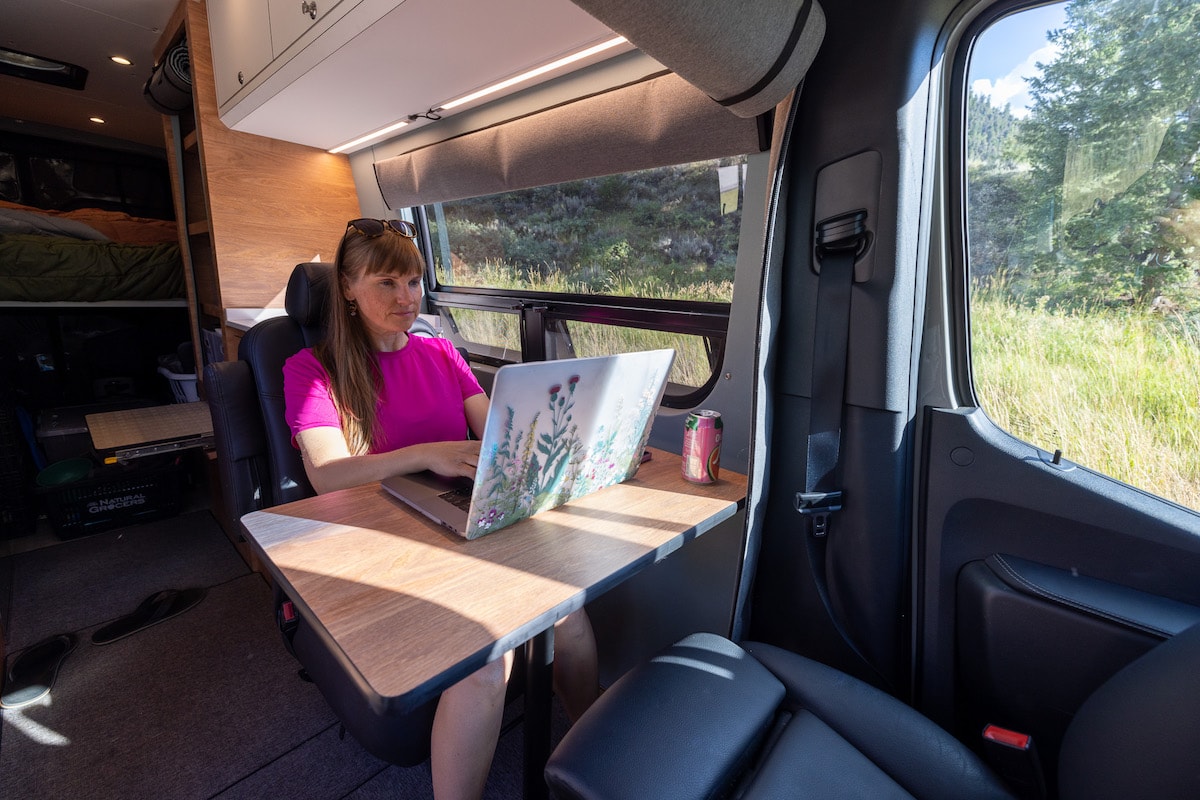
Nevertheless, as the whole lot in these vans is a tradeoff for area, and a should for this third Sprinter Van was to have an extra passenger seat behind the motive force to securely transport a baby. With the intention to make area for this captain’s chair, we’d need to forgo a dinette and devoted workspace like we had in our final van.
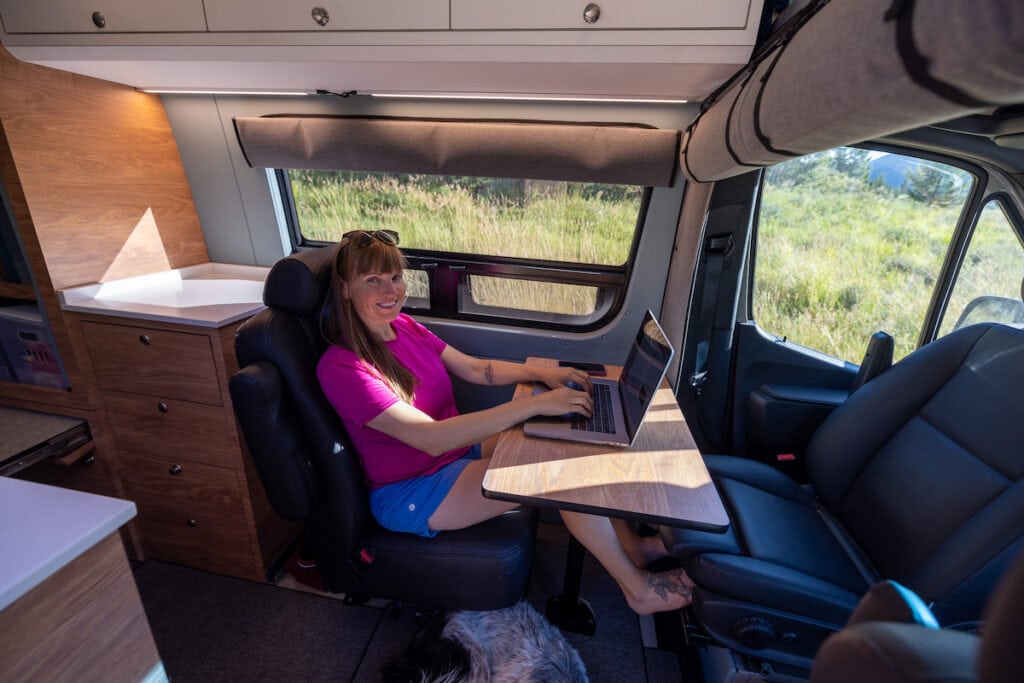
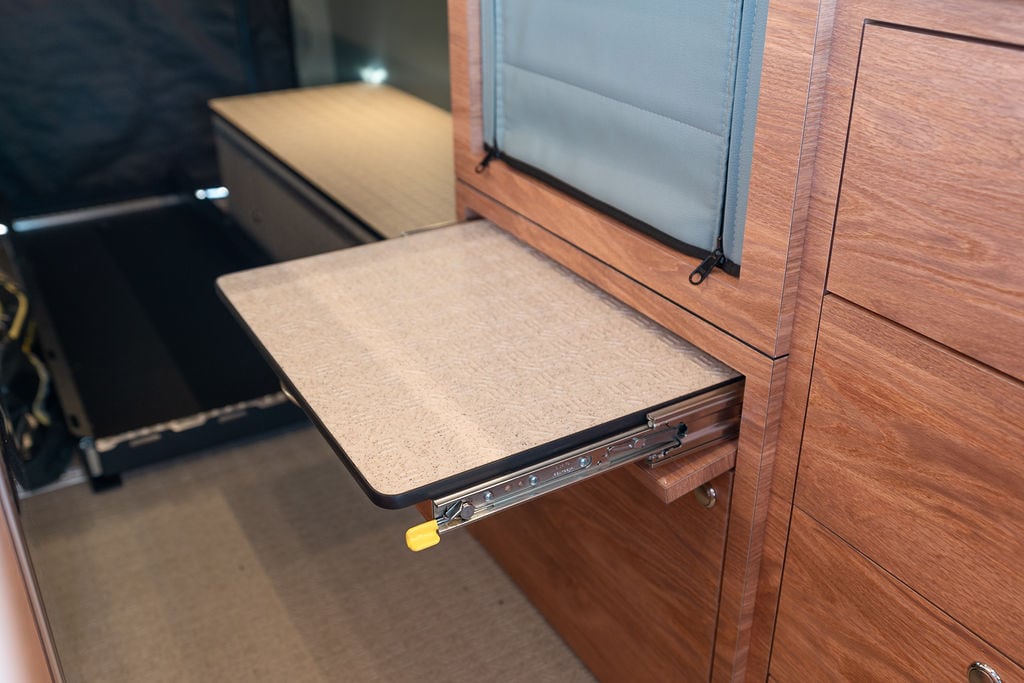
On this new van, after we aren’t driving, we have now a desk that shortly pops into the ground. When it’s time for me to work, I can use that extra captain’s chair as my workplace chair. Though it takes me a bit extra time to get arrange with my laptop on this van, I’m actually liking having a extra ergonomic chair to sit down in whereas I work in comparison with the dinette cushions in my final van that all the time bothered my again after some time. We additionally make the most of the swivel seats and the desk to create a 3 individual eating space.
The desk stows proper behind the captain’s chair in opposition to the motive force’s facet galley cupboard so it’s out of the way in which when not in use.
I’m not fairly positive concerning the sleeping preparations as soon as the kiddo is larger, however no less than at first, a bassinet will simply slot in entrance of this captain’s chair the place the desk pops in. By the point he’s sufficiently big for a mattress, I’m positive there will probably be numerous options primarily based on the tempo this business is innovating.
Cupboard & Galley Supplies
All the cabinetry within the van is product of 13-layer marine grade plywood which is handled so it gained’t broaden in warmth or distort over time. Marine grade plywood is the usual utilized in boats and is made to resist a bumpy trip.
All the cupboard and drawer faces are coated utilizing a high-quality laminate made by Wilson Artwork, which supplies all the wooden within the van a pleasant end whereas defending the marine grade plywood beneath. Laminate is light-weight and far more sturdy than common wooden. I selected the Monarch Alona Grain for the decrease cupboards and the Traceless Snow White Velvet for the overhead cupboards. The Traceless will not be supposed to indicate fingerprints, however being white, it nonetheless reveals grime very simply, so I’m undecided I’d go along with the white up high sooner or later.
Outdoors Van makes use of dovetail building for his or her drawers that are made out of antimicrobial and eco-friendly bamboo. All the drawers have a sluggish closing mechanism to stop them from slamming shut and have push locks to maintain the drawers and cupboards from opening whereas I’m driving.
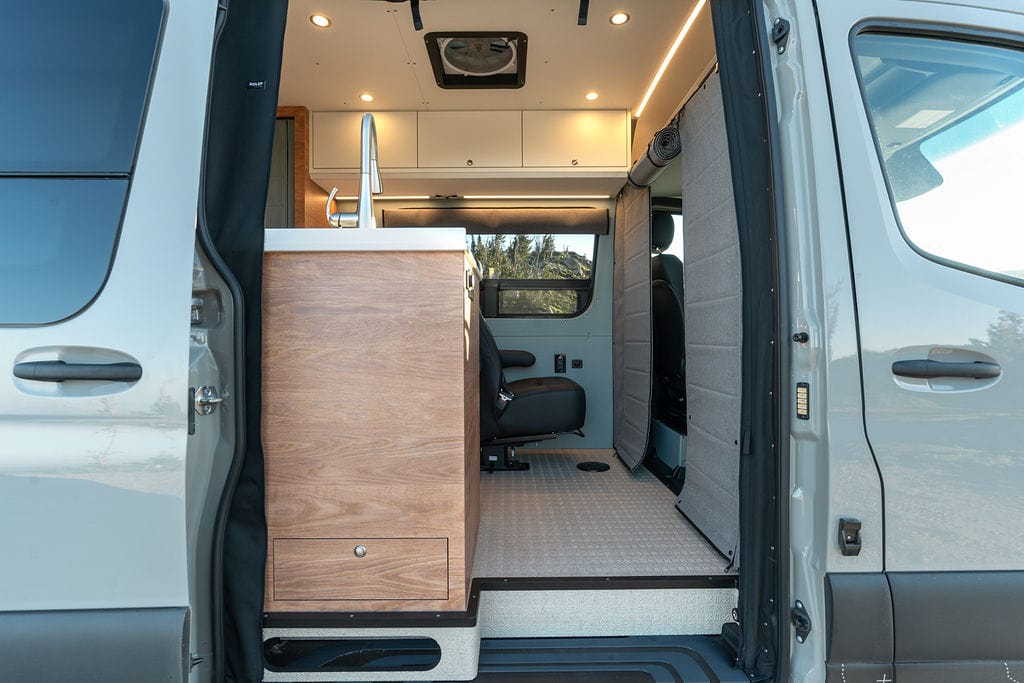
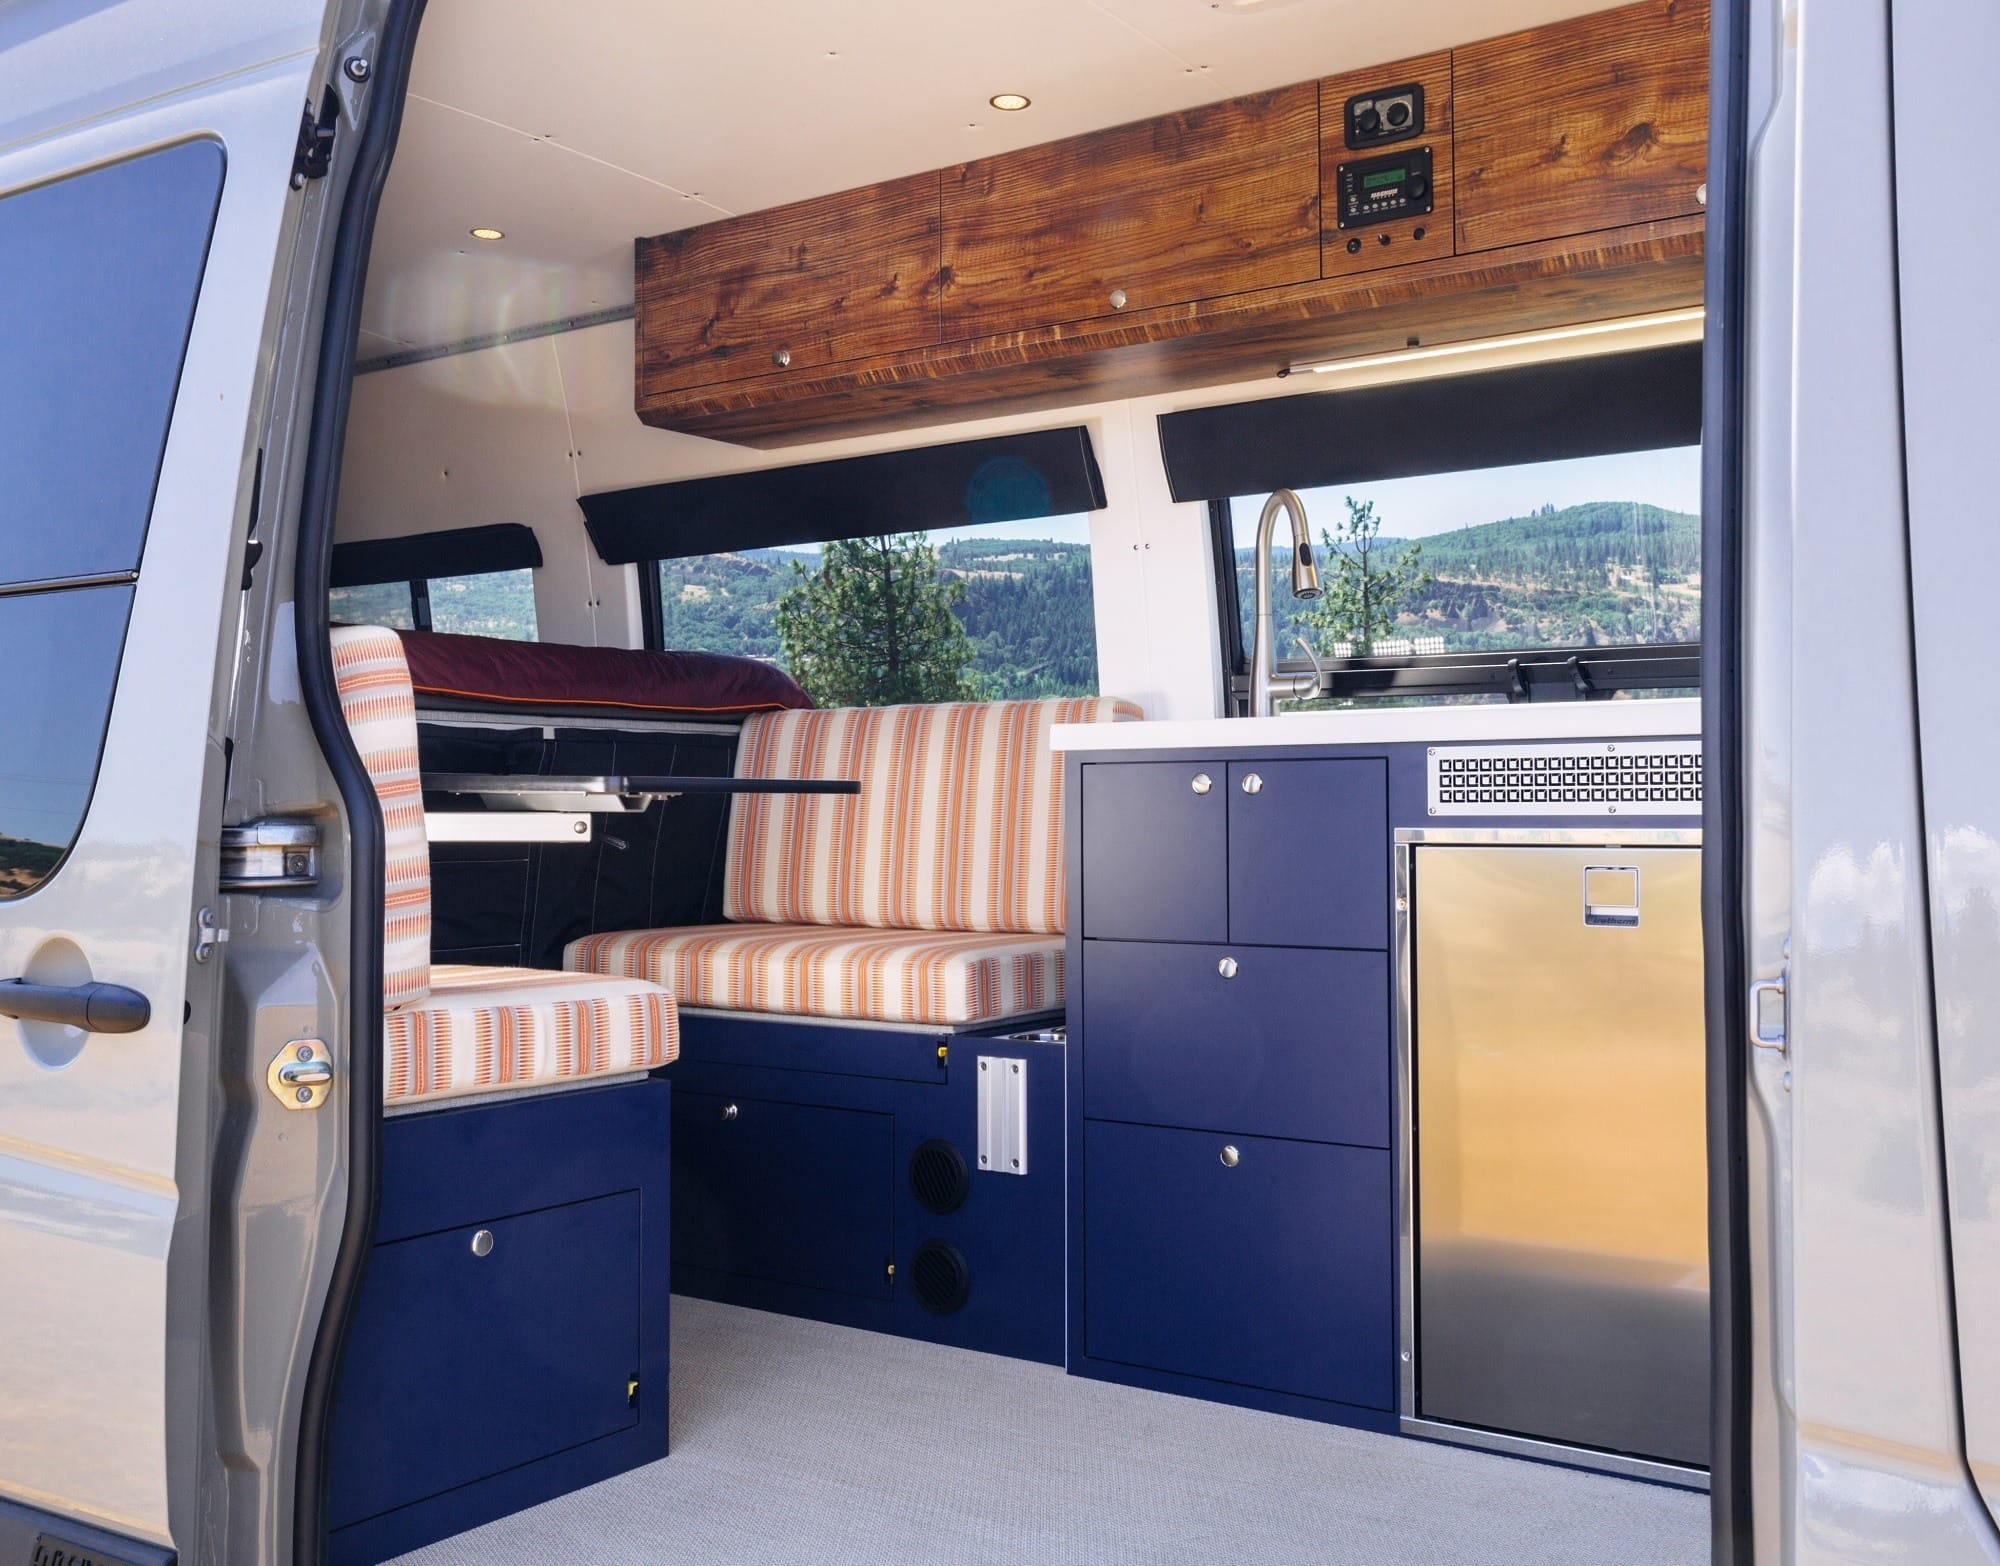
Passenger Facet Sprinter Van Customized Galley
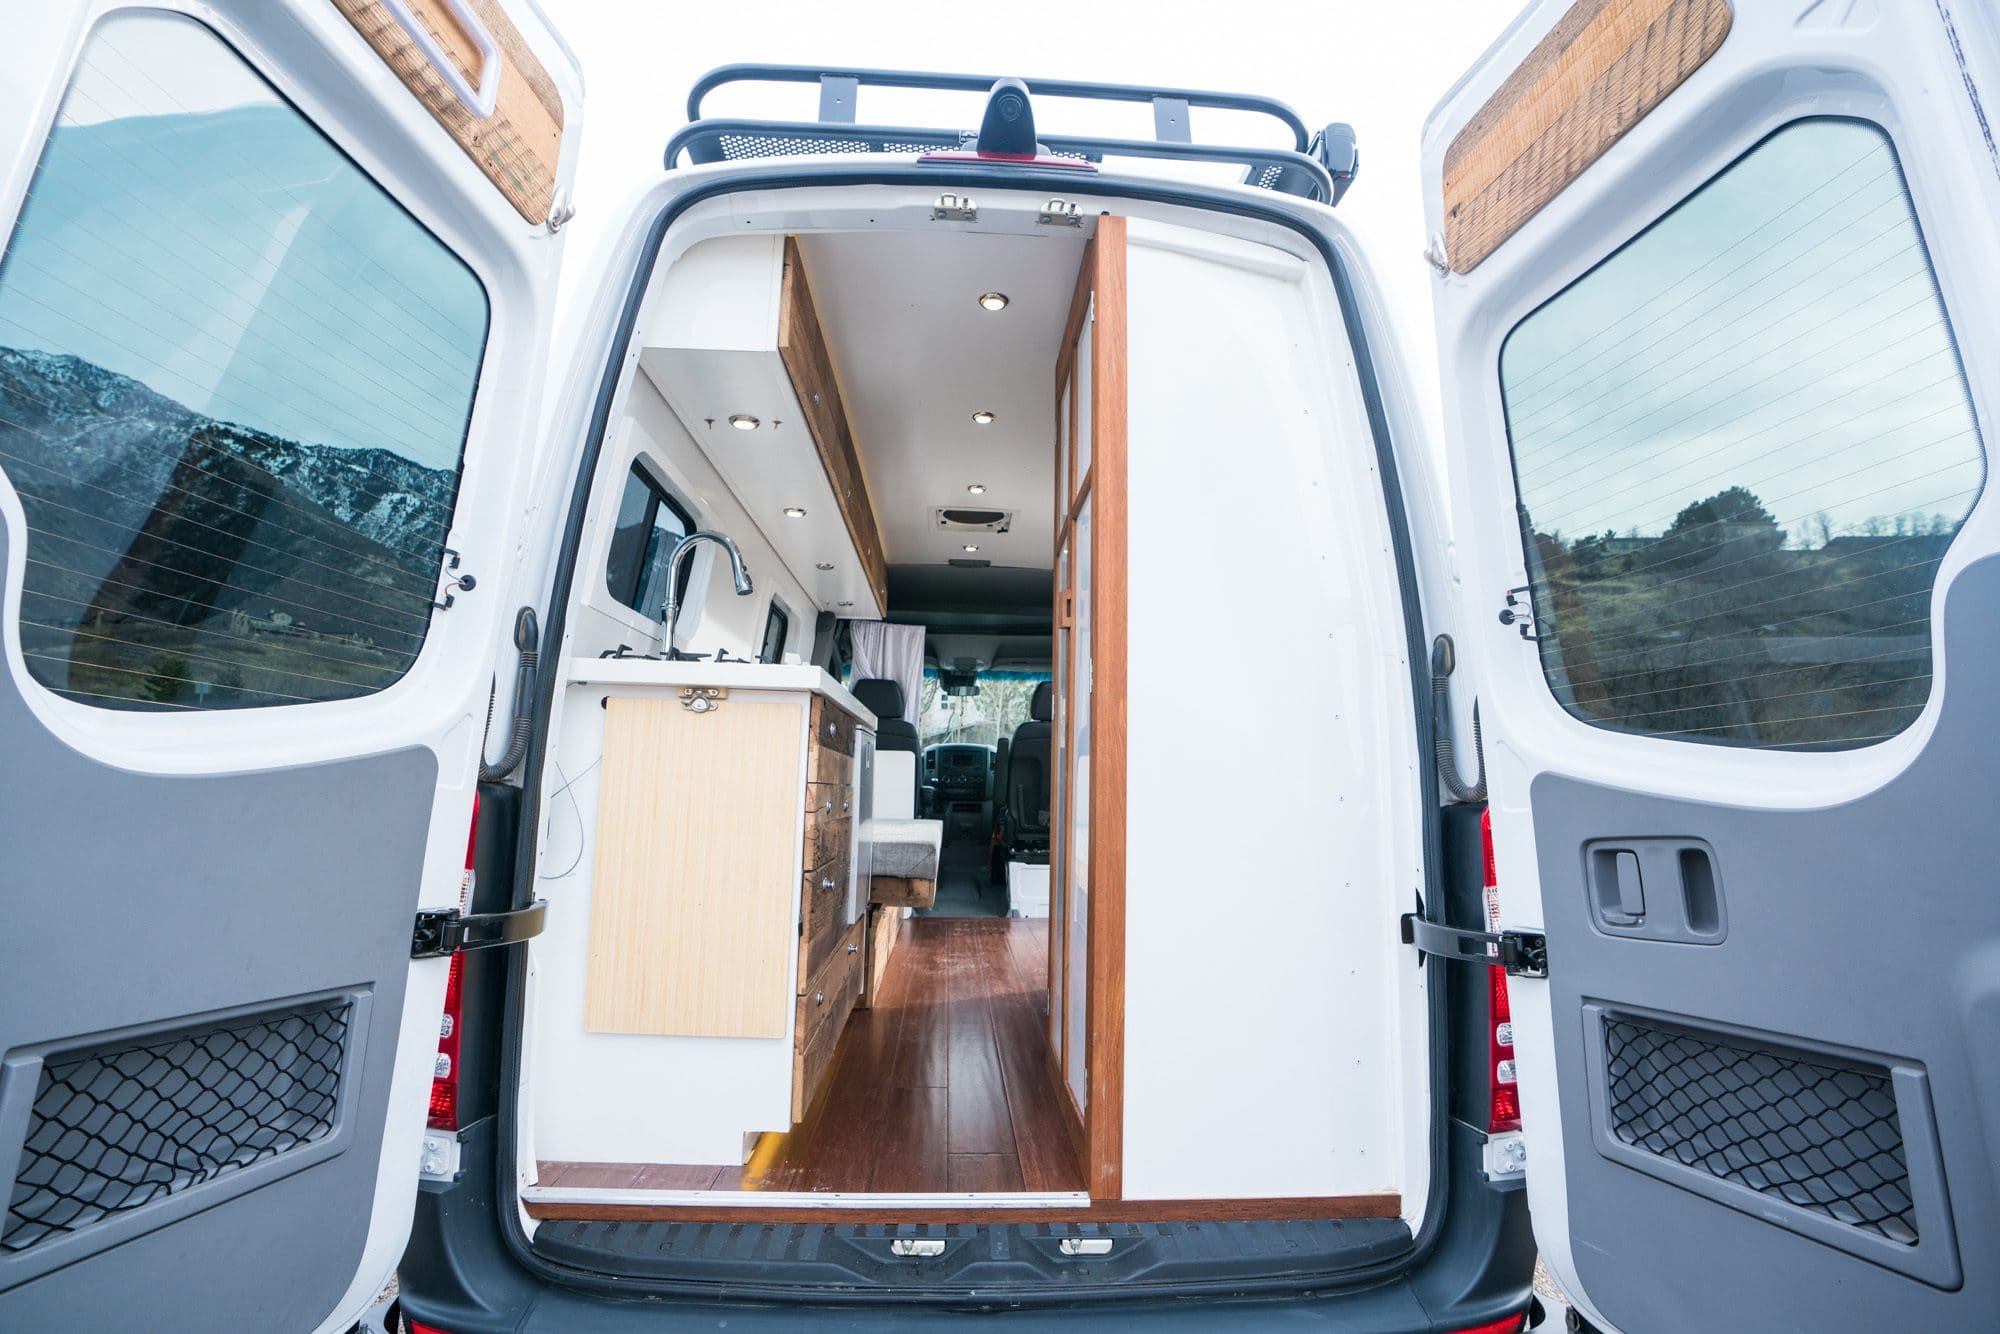
In my third Sprinter Van, I selected to have the {custom} galley come out into the slider door to maximise using area within the van.
The passenger facet galley has the next parts:
- Giant rectangular sink
- One burner induction range
- Fridge
- Large compartment for a trash and a recycling bin
- Slide out outside cooking desk
The white galley countertop is product of a fabric referred to as Corian within the glacier white colour. Corian is a sturdy materials that may stand up to regular put on and tear, though I do discover a number of scratches already. The Corian can be very straightforward to scrub, and I really like the trendy look it provides the van.
Want inspiration on your personal van kitchen? Try these artistic van cooking areas.
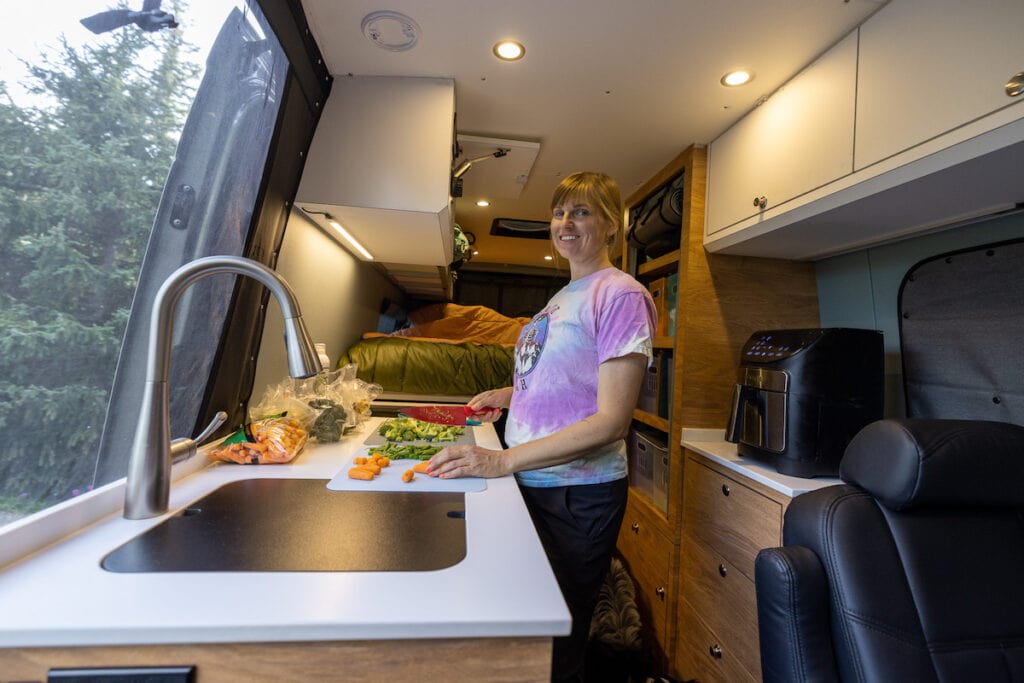
Induction Range
In my first Sprinter Van conversion, I had a everlasting two burner propane range contained in the van. The fuel range was an enormous ache to scrub, and it took up a ton of counter area that was in any other case unusable. Since then I’ve switched to a one burner induction range which I a lot choose. The mannequin in my present van is the True Induction single burner range which requires 1800 watts to function at most temperature.
Having a one burner induction makes it very handy to arrange easy meals and boil water with out having to arrange our propane and two burner fuel range outdoors, which we nonetheless prepare dinner on for extra complicated meals.

Whilst you do want a strong battery financial institution and inverter to run an induction range, they’ve a number of advantages. The True Induction range in my Sprinter Van heats up and cools down quick, so that you aren’t more likely to burn your self. Induction stoves are additionally straightforward to scrub and safer because you aren’t combusting fuel contained in the van. One different factor Outdoors Van did is made the induction range fully flush with the countertop, so when the range isn’t on, it mainly serves as regular counter area for chopping, and so on. The induction range can be particularly helpful for van life in winter or after we are stealth tenting.
Fridge
The fridge in my Sprinter conversion is the Isotherm 4.6 cubic foot Cruise Class 130. Isotherm is without doubt one of the premier marine and RV fridge firms, and their fridges are designed to outlive shaking, vibration, and inflexible actions that you’ve in vans and boats.
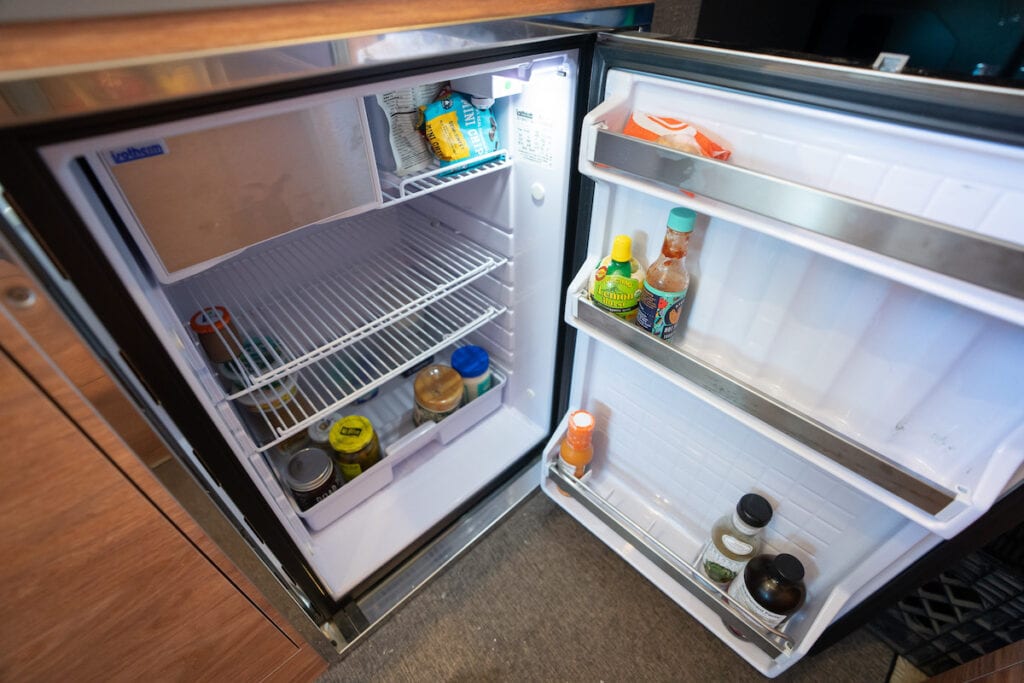
Whereas it takes a little bit of Tetris, we are able to match a couple of week’s value of meals within the fridge which is sweet for minimizing journeys to the shop. I do have two complaints concerning the fridge although. First is that after about 6 weeks, the freezer begins to ice up and the whole fridge needs to be turned off and defrosted. This can be a ache when you find yourself touring with out entry to an actual fridge the place you’ll be able to retailer your meals throughout this defrosting course of. The second subject is that produce appears to go unhealthy much more shortly than it does at residence. I feel that’s as a result of the fridge will get packed so tight that there isn’t a lot air circulation in there. I not too long ago purchased a few of these produce keeper bins, and whereas they’re a bit cumbersome they do appear to be serving to a bit bit.
For a comparability of upright fridges vs high loading chest fashion fridges on your van conversion, see this weblog publish.
Sink
For the sink, we have now a pleasant pull-down faucet and a big, spherical stainless-steel under-mount sink. I wished a sink giant sufficient that may make doing dishes very straightforward. Outdoors Van additionally created a canopy that sits flush with the sink and creates a flat floor for extra prep area.

Trash Can Compartment
When many individuals are changing their Sprinter Van, trash storage is an afterthought. In my first Sprinter, I believed, “I’ll simply dangle a bag someplace off a hook.” Effectively, as soon as I spotted that 1) that allowed smells to permeate the van, 2) it wasn’t dog-proof and three) it was ugly to take a look at, I made a decision having a devoted place for trash cans was important.
In my third Sprinter Van conversion, I had Outdoors Van construct an enclosed trash can compartment that was personalized for 2 tall kitchen trash cans – one for rubbish and one other for recycling. Having all of it behind a closed door retains the smells extra contained and it additionally prevents the canine from sniffing round and moving into bother when they’re left alone. I actually like that the 2 trash cans within the compartment are giant. It means we are able to go fairly a very long time earlier than we have to discover a dumpster to throw our rubbish away.

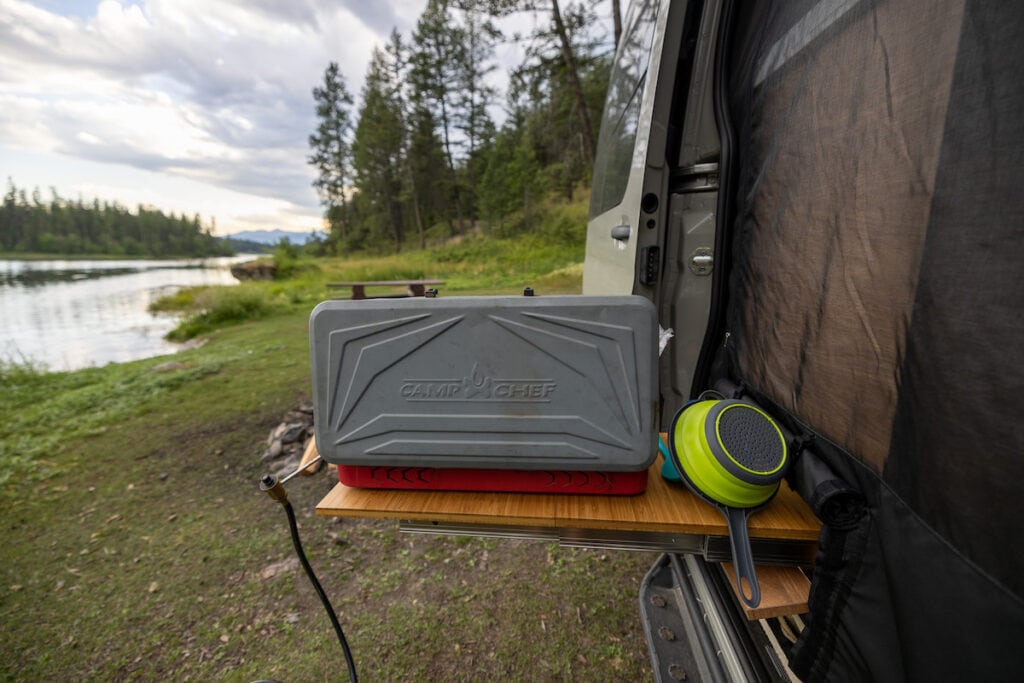
Slide Out Out of doors Cooking Desk
On the surface of the galley, we have now a slide out cooking desk for outside cooking. This enables us to depart our moveable camp cooking desk at residence.
Driver’s Facet Galley
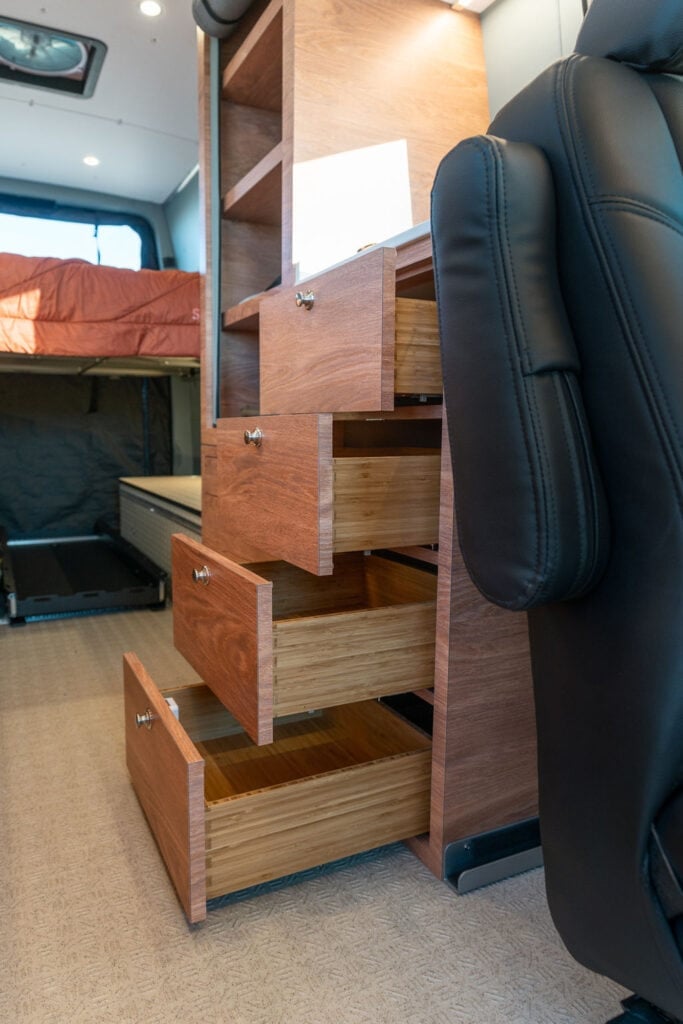
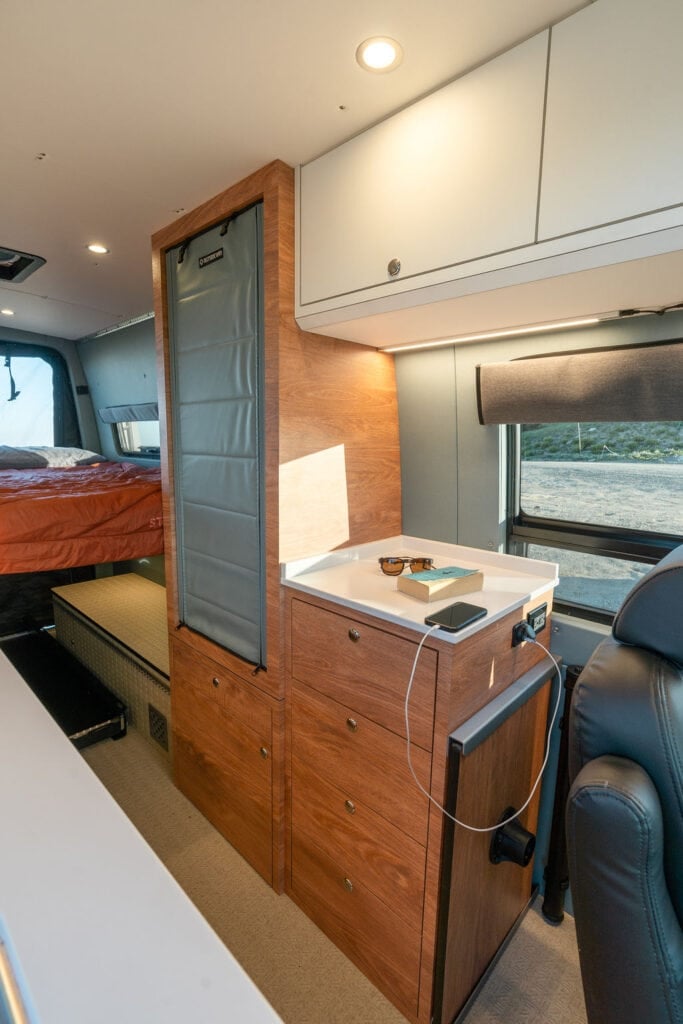
On the motive force’s facet of the van behind the captain’s chair, there’s a smaller cupboard with 4 drawers. That is the place we retailer our cooking utensils, spices, and tupperware, and there’s additionally a junk drawer for random gadgets (one other important in my view). This space is sweet not solely due to the extra storage, but it surely additionally supplies additional counter area.
You’ll additionally discover within the above picture that the desk high and leg are saved on the entrance facet of this driver’s facet galley, which supplies the desk a house and retains it out of the way in which when it’s stowed. The desk easily slides out and in and could be very safe after we drive.
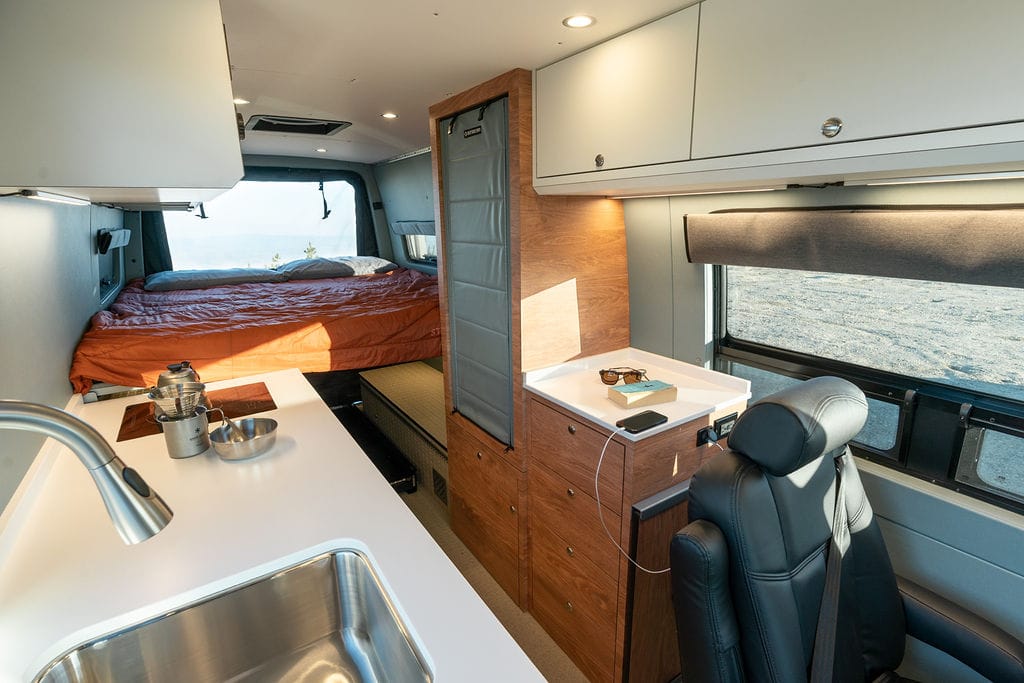
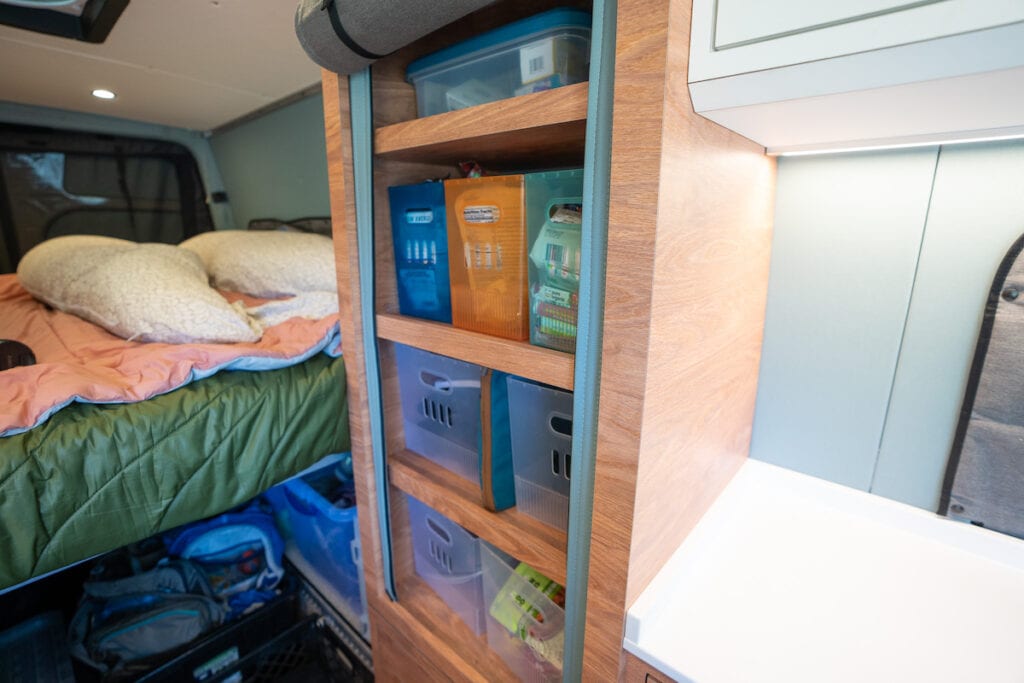
Customized Ground to Ceiling Closet
Shifting additional again, we have now a flooring to ceiling closet. This isn’t for garments, though you may retailer folded garments in right here for those who wished. As an alternative we’re utilizing this area for meals, smaller gadgets, work stuff, and a few of our cooking home equipment like our blender.
I measured the size of every shelf, after which I went to the Container Retailer and located some light-weight bins that may assist hold this area organized. The deal with on the bins make it straightforward to tug them out and get what we want, and every shelf has a lip that stops the bins from sliding round.
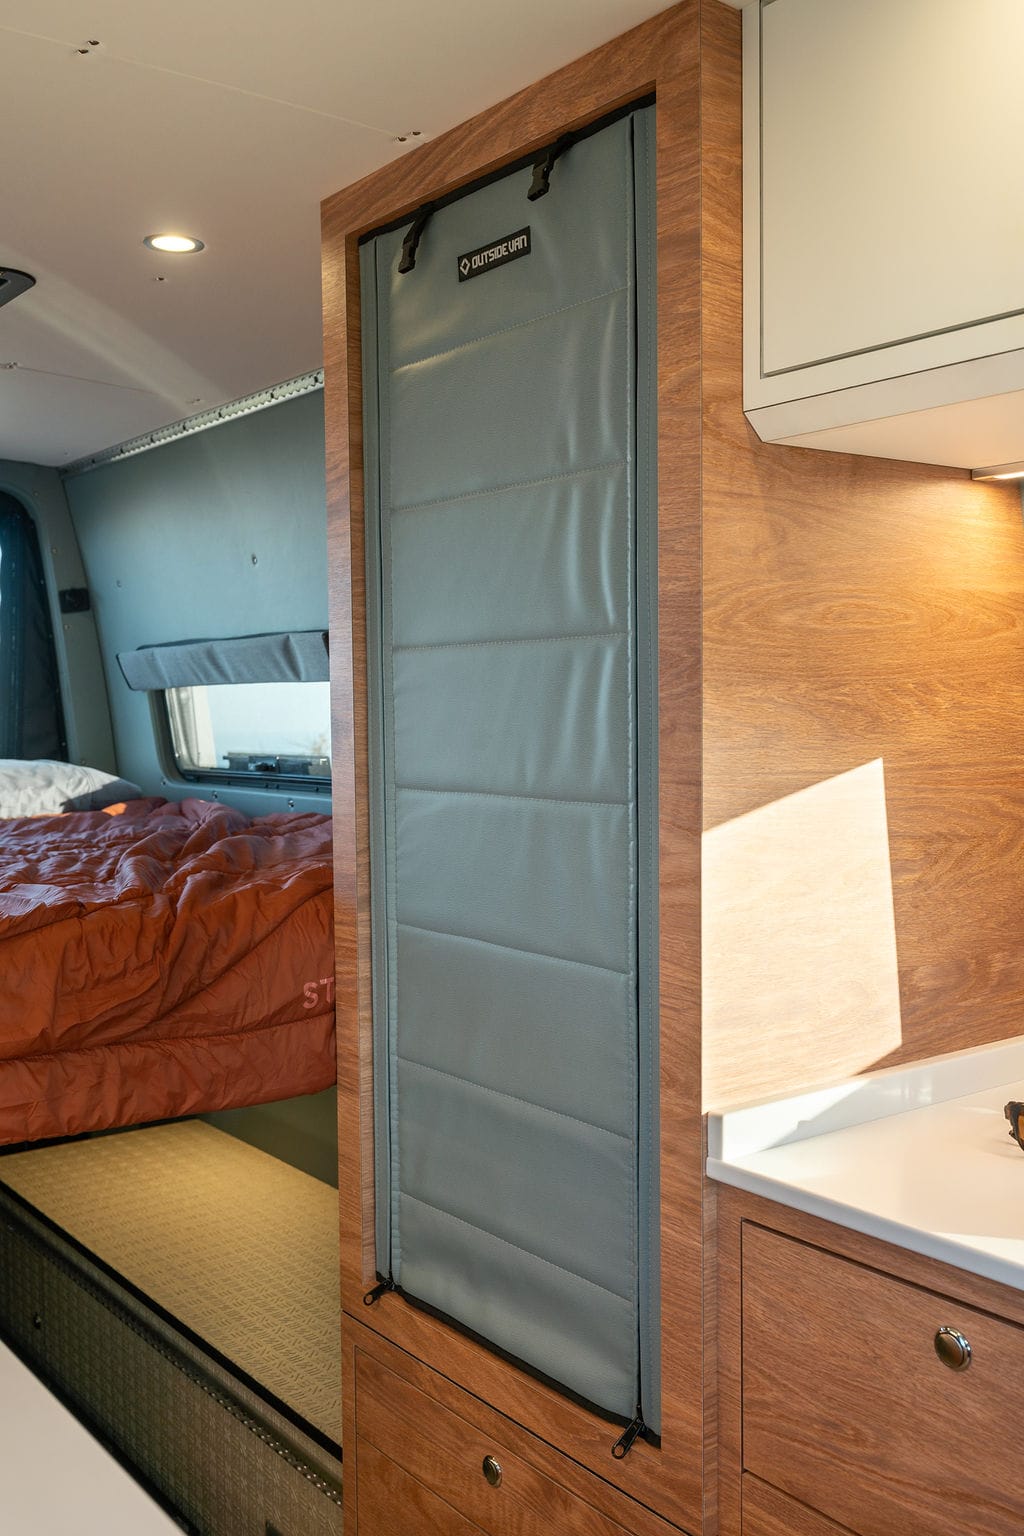
The door of the closet is product of Sileather. It’s tender and it zips and rolls up, clipping on the high. I selected a roll up door as an alternative of a door that swings open for 2 causes. First, this roll up door is lighter-weight than a door made out of wooden, and it’s all the time good to chop weight wherever you’ll be able to. Second, having it roll up means I can entry the within of the closet from the mattress or from the entrance of the van anytime. A swing out door would have solely allowed entry to the closet from one facet and would have taken up more room. That is the primary closet of its sort that Outdoors Van has constructed, and it might be considered one of my favourite options of my van conversion.
Once I was designing this van, I puzzled how we (and our canine) might simply rise up onto the mattress. Outdoors Van got here up with this genius concept to have a pull-out step instantly under the closet. This step is the right peak for climbing out and in of the mattress and likewise serves as an additional seat that has are available in handier than we anticipated when cooking or placing on our sneakers. The step has a load score capability of 300 kilos, and we go away it out after we are driving since Charlie likes to trip within the mattress.
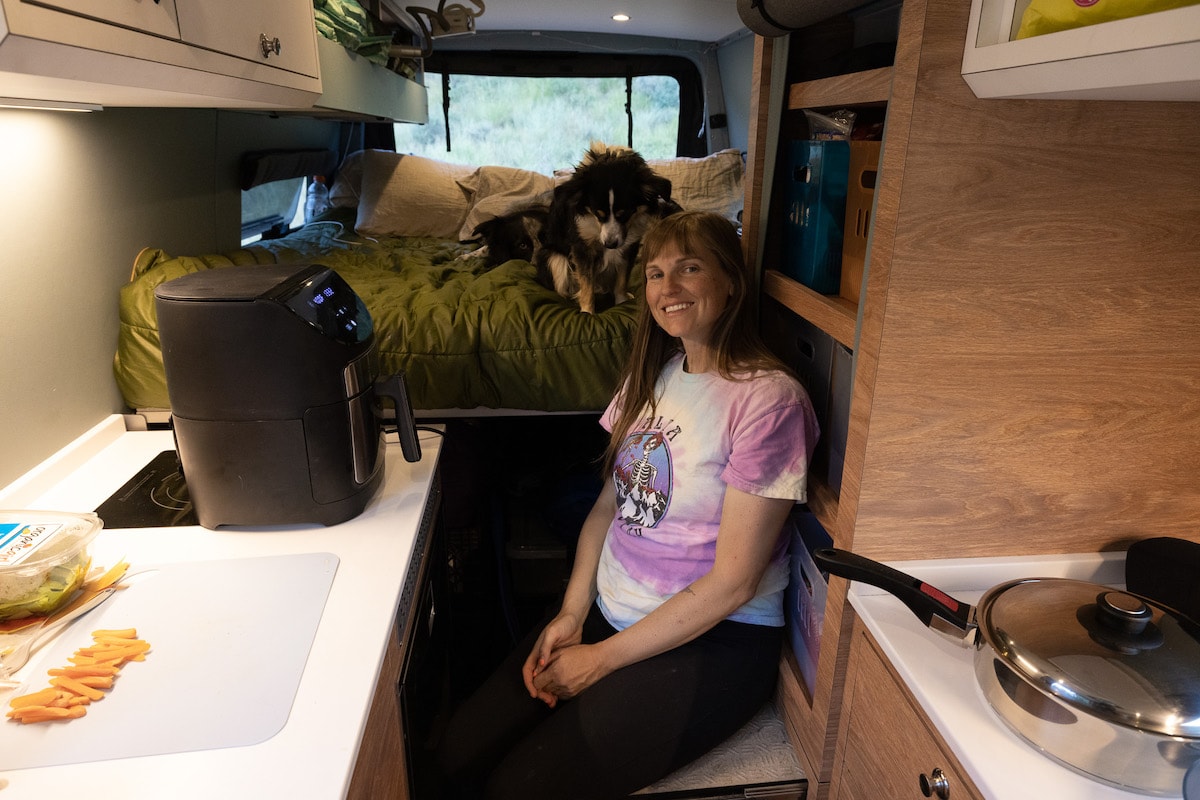
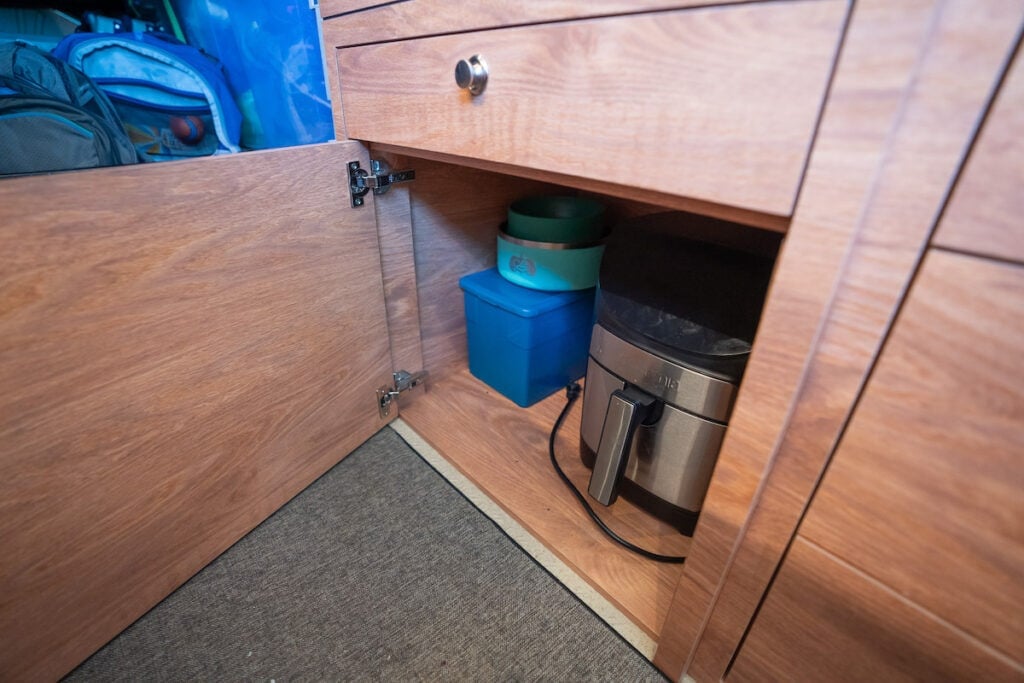
Under the step is a big open cupboard. We designed this cupboard to be sufficiently big for a transportable rest room if we determined to have one (try the greatest campervan rest room choices right here). We at present don’t carry a transportable cassette rest room (extra on our rest room under), so as an alternative we use this space to retailer our pet food and our air fryer. And sure, we carry our air-fryer – it requires 1500 watts on the highest temps, and we are able to bake, make toast, prepare dinner tofu, and extra with it.
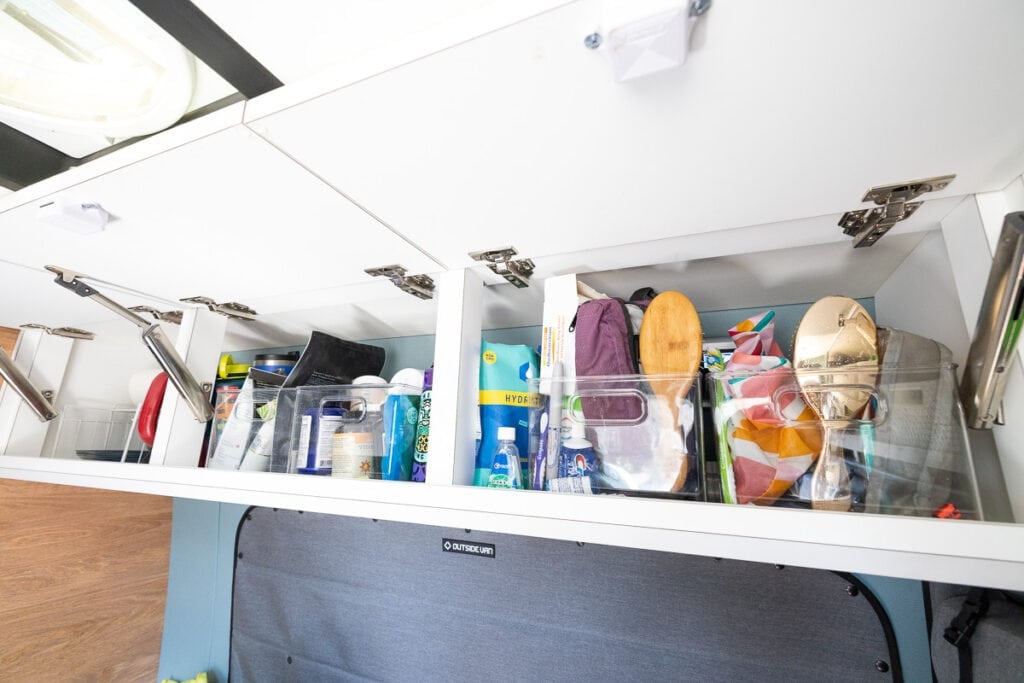
Overhead Cupboards
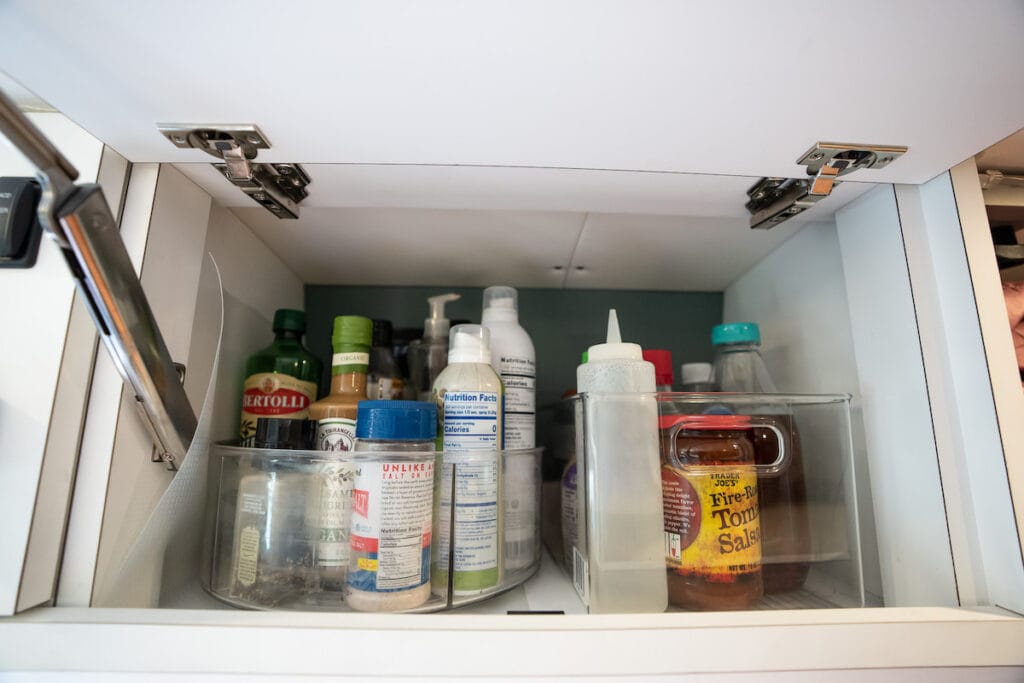
On either side of the van, there are overhead cupboards. On the motive force’s facet, we have now one above our galley the place we retailer cooking components, oils, cleaning soap, and extra. We prefer to hold stuff up right here in a lazy susan for simple entry.
On the motive force’s facet above the third passenger seat we have now an extended overhead cupboard. That is the place we retailer our dinnerware, espresso and morning drinks, paper towels, and toiletries.
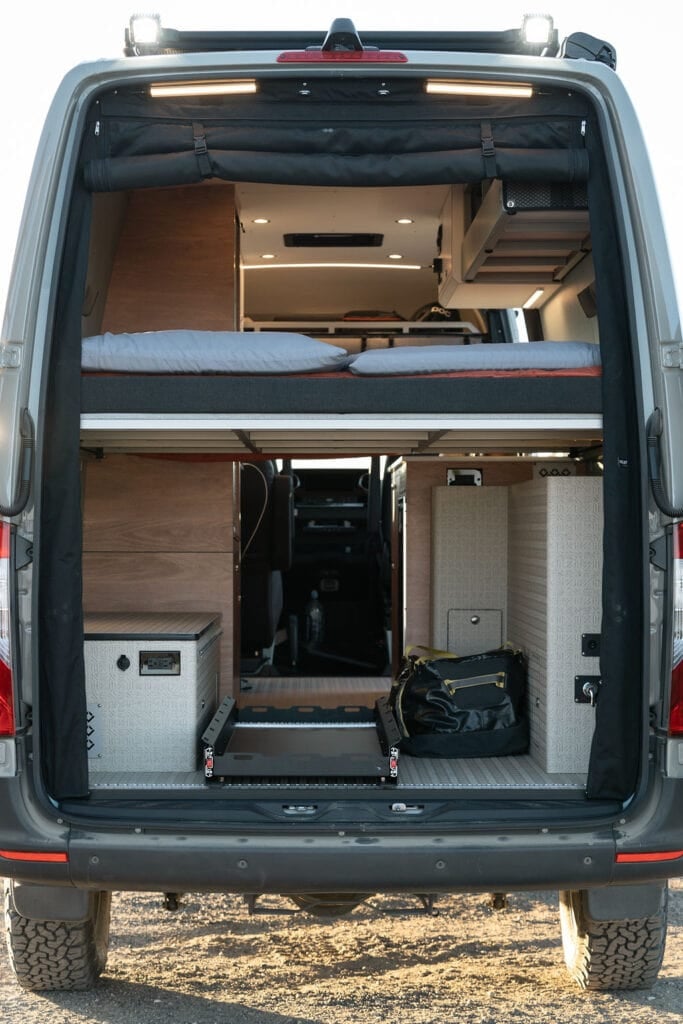
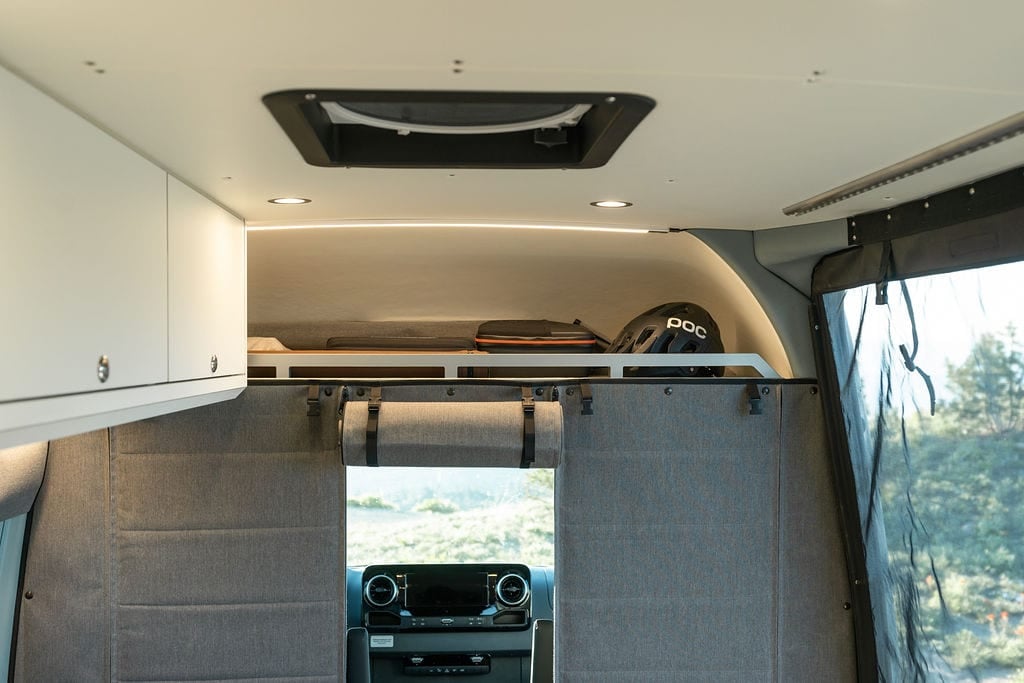
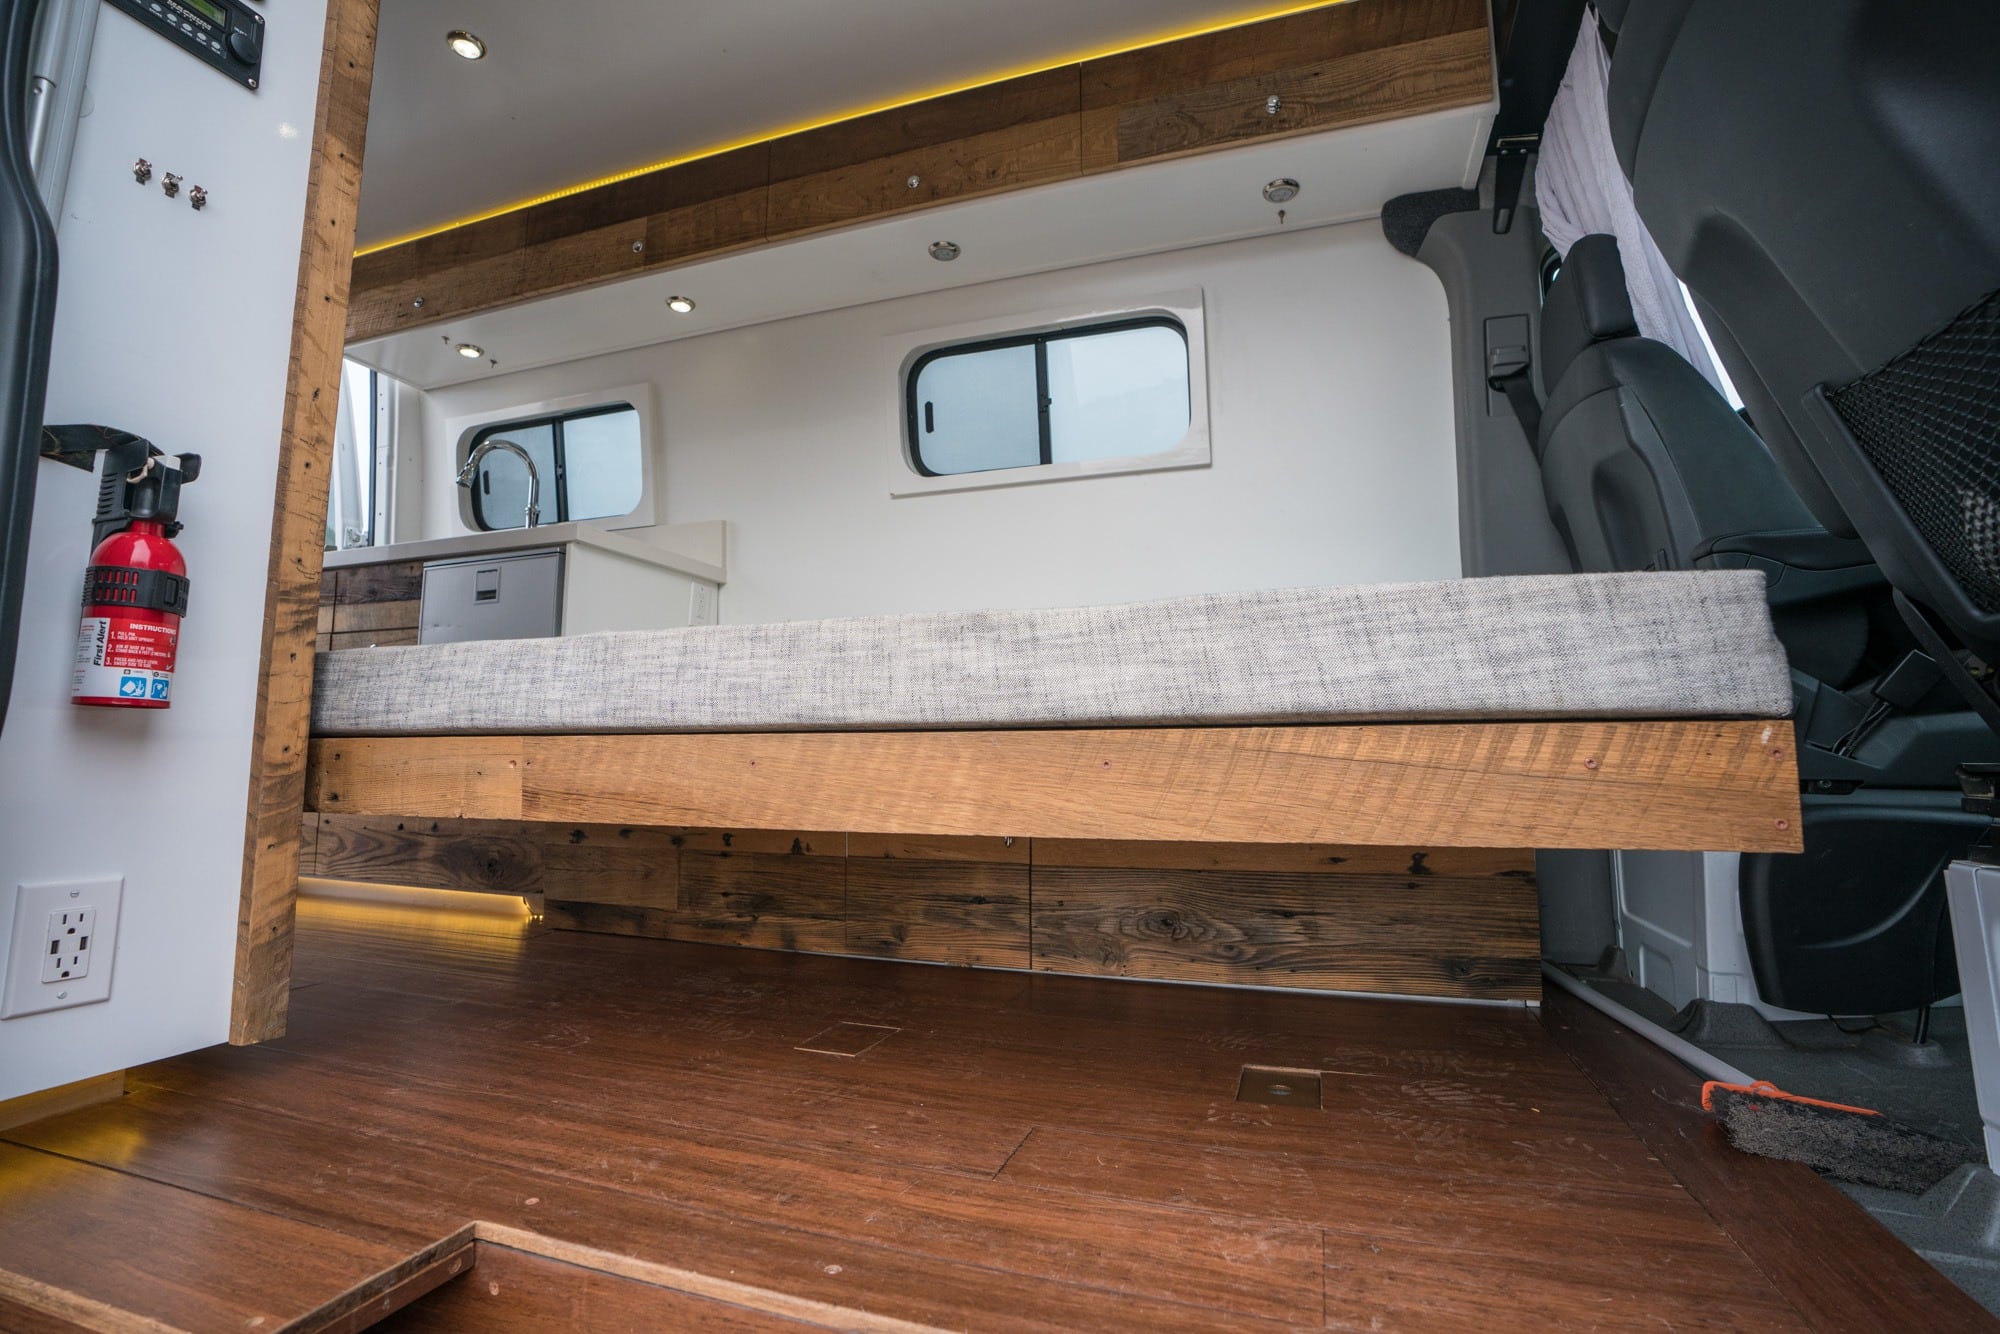
Outdoors Van Sprinter Van Three-Panel Mattress
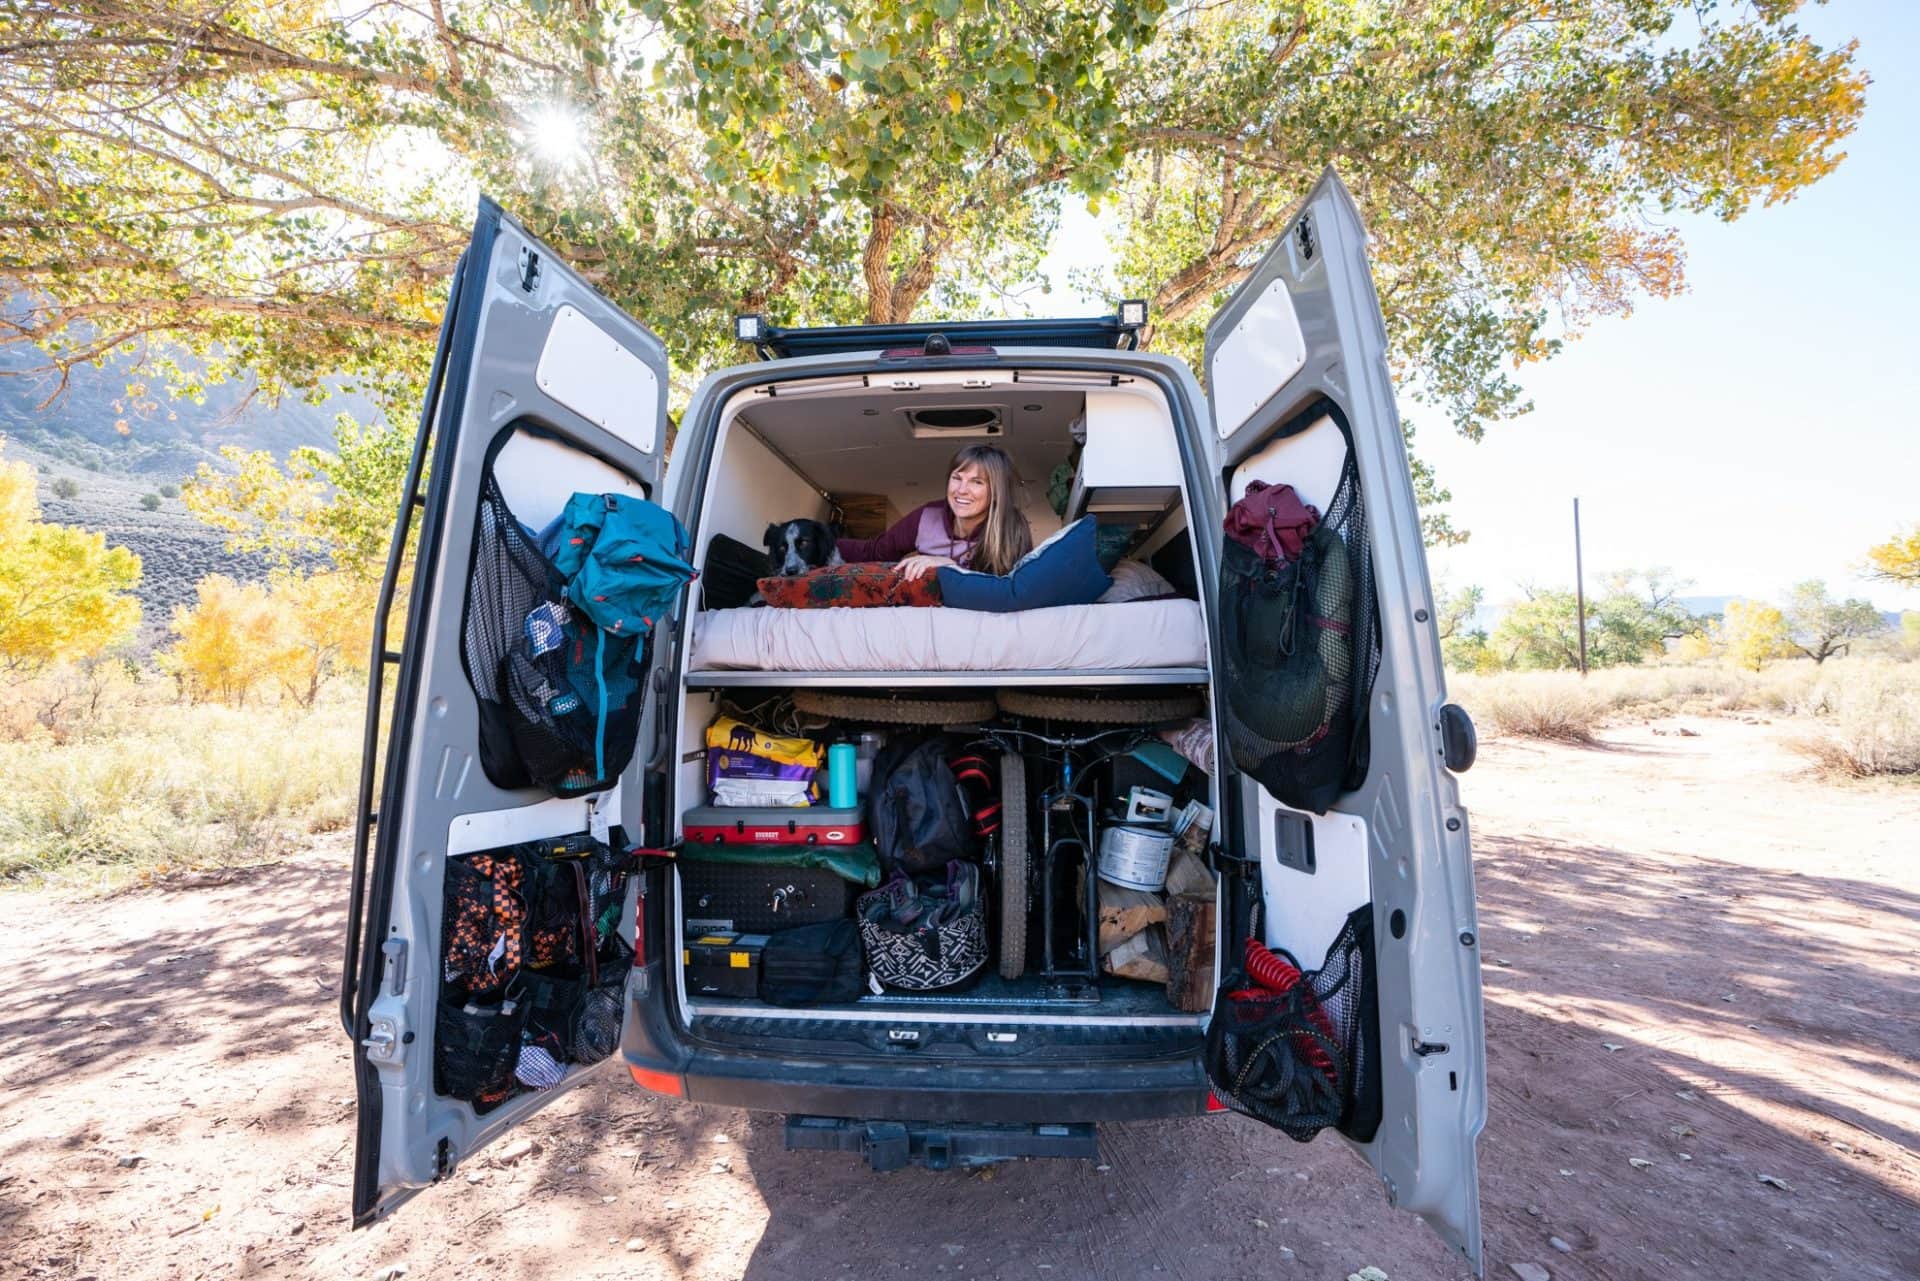
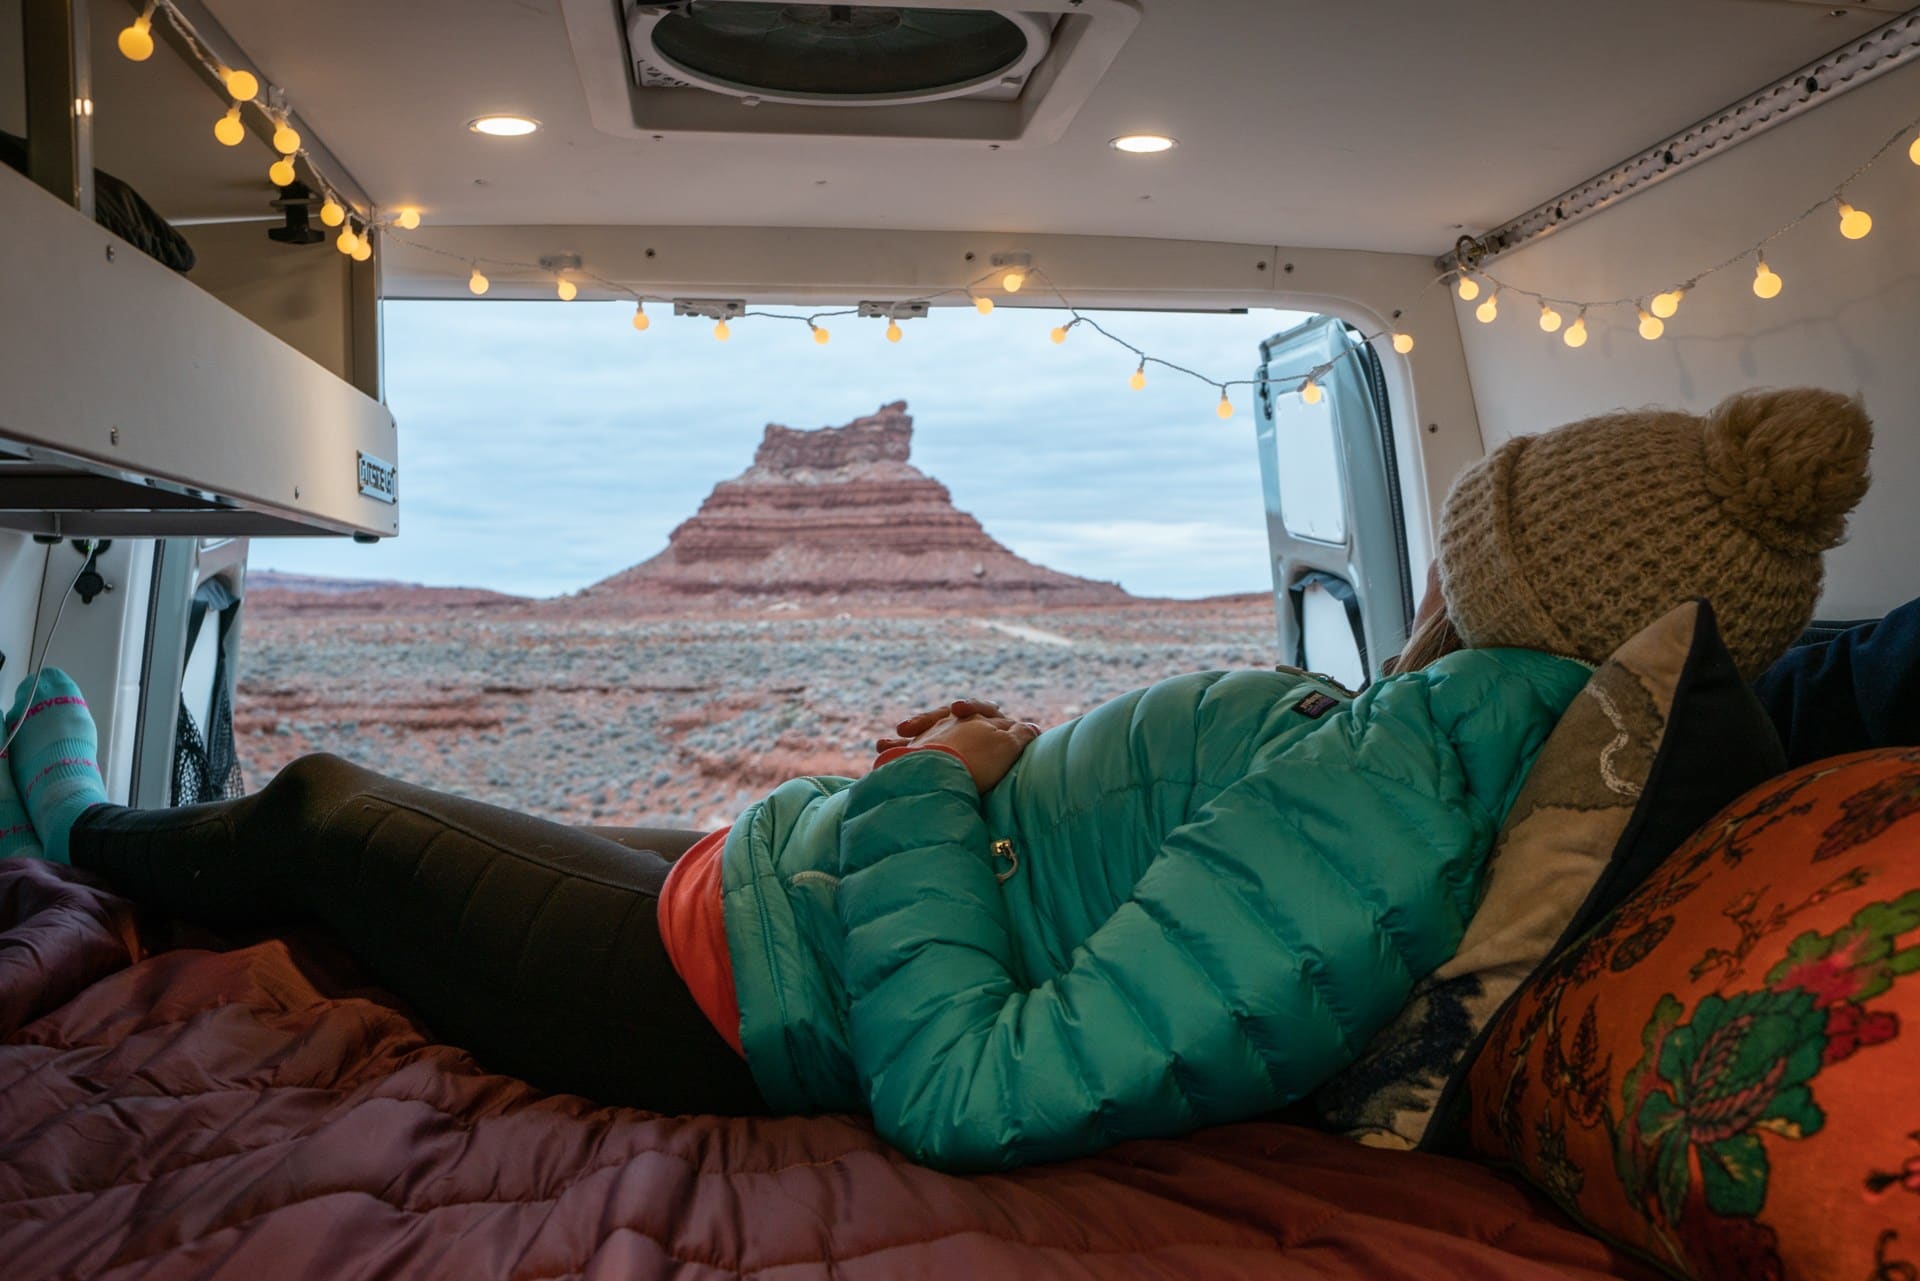
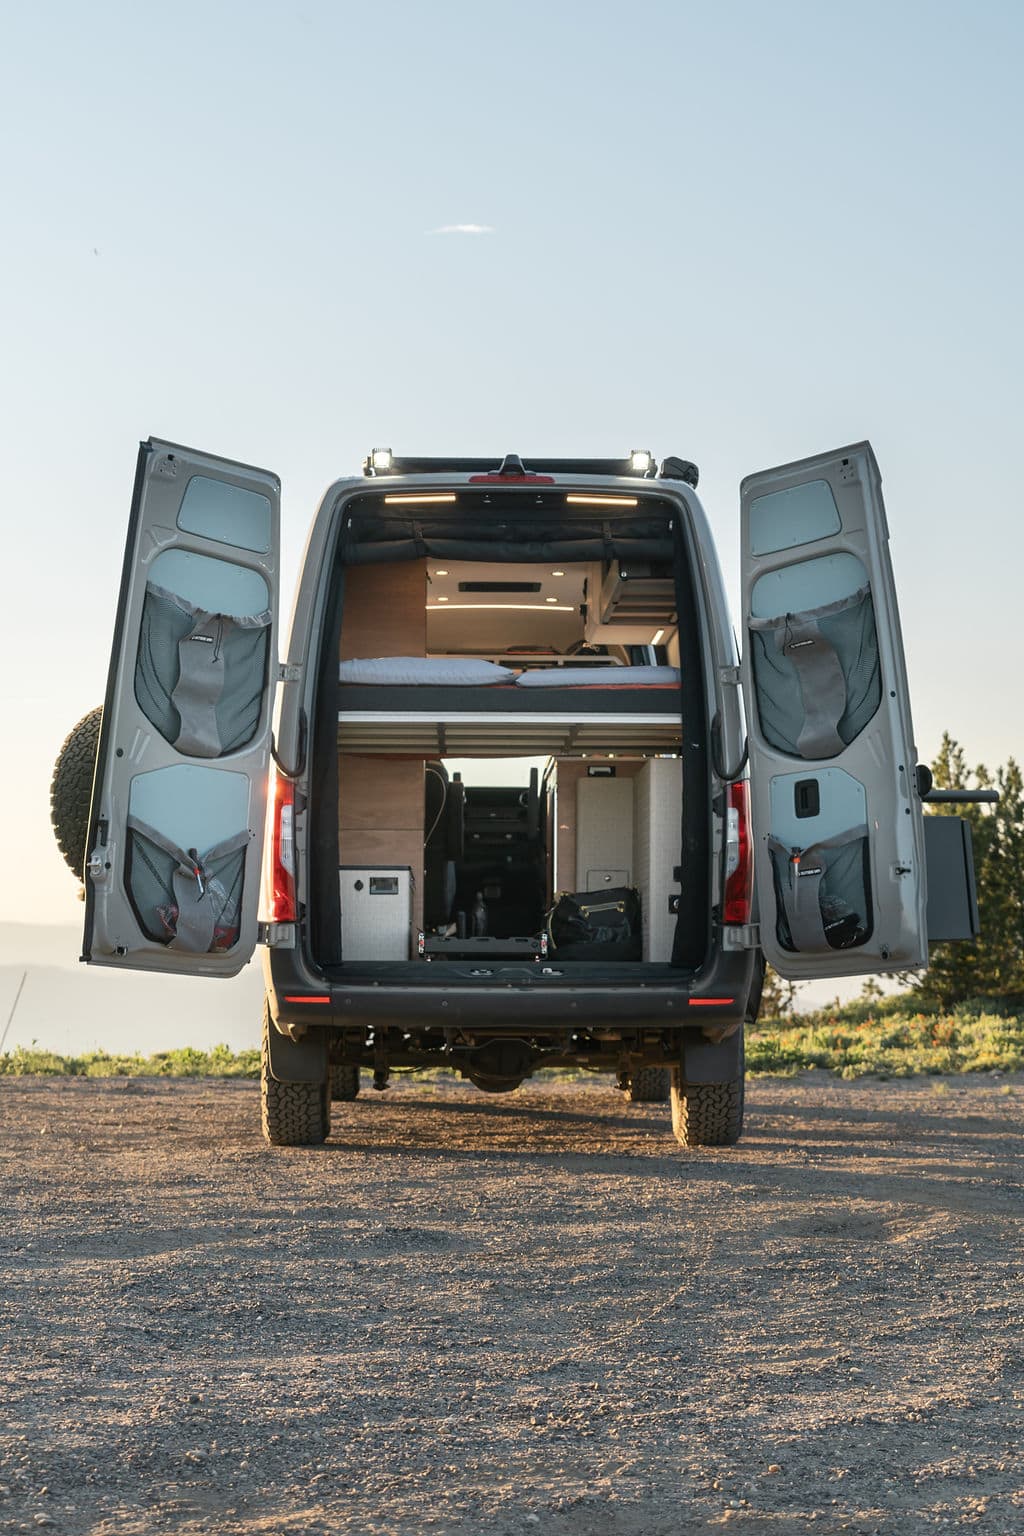
Subsequent on the rear of the van is Outdoors Van’s normal three-panel aluminum platform mattress that goes all the way in which to the again doorways with Outdoors Van’s exoskeleton cupboard for clothes storage. The mattress is a queen-sized mattress. All three panels are secured to the mattress rails by way of spring-loaded threaded fasteners. The mattress panels can be eliminated if I wished to make use of the again of the van to maneuver furnishings, for instance.
I selected a {custom} 4″ latex mattress which was a dear improve. To be trustworthy, I don’t discover it very snug (it’s much more agency than I anticipated), and it’s the one factor I remorse within the van. With the intention to make it extra plush, we added the identical three inch latex topper that we had in our final van. Now it feels superior, however we misplaced three inches of headspace as a result of topper, making the mattress really feel a bit extra cramped.
My comforter for individuals who are curious is made by Rumpl. It’s an awesome possibility for pet house owners as a result of it’s machine cleanable and canine hair doesn’t cling to it.
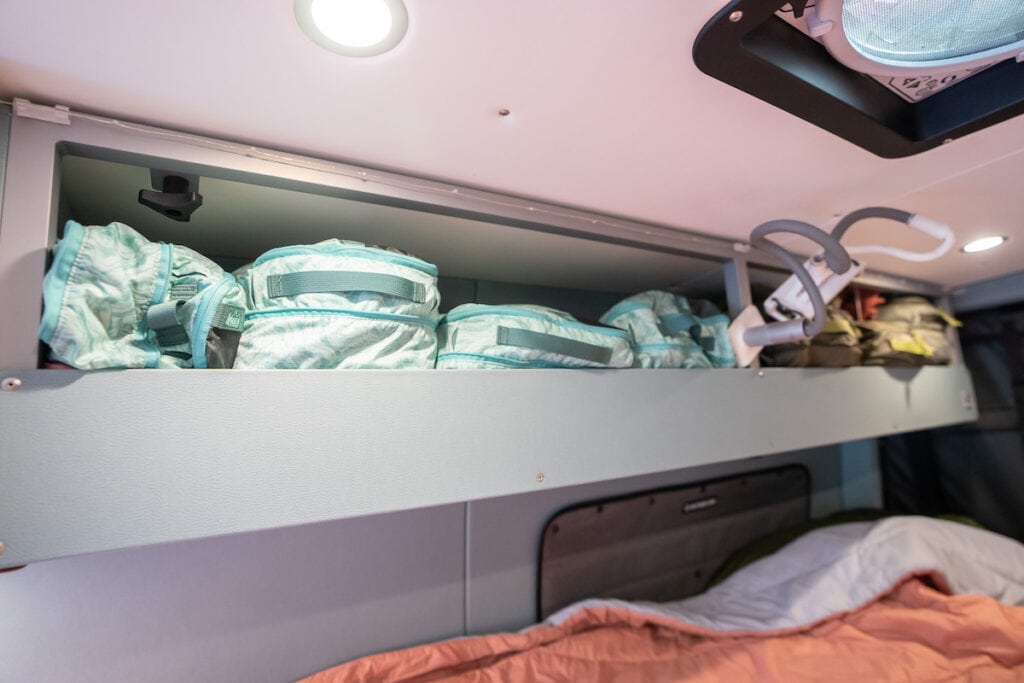
Exoskeleton Cupboard Clothes Storage
On the passenger facet of the van, I’ve what Outdoors Van calls an exoskeleton cupboard which is open with no cupboard face. This fashion of cupboard is stuffable, detachable, modular, and extra light-weight than conventional cupboards. We use this exoskeleton cupboard to retailer packing cubes containing all of our garments.
We every have one packing dice for pants, one for shirts, one for underwear, and one for socks. Try my full van life clothes packing guidelines right here.
The open fashion cupboard has its execs and cons. I like that it’s straightforward to stuff a jacket in there or shortly seize one thing. On the identical time, except you might be tremendous diligent about placing your garments away in your packing cubes, it could actually shortly look messy and unorganized, which is commonly the case for us.
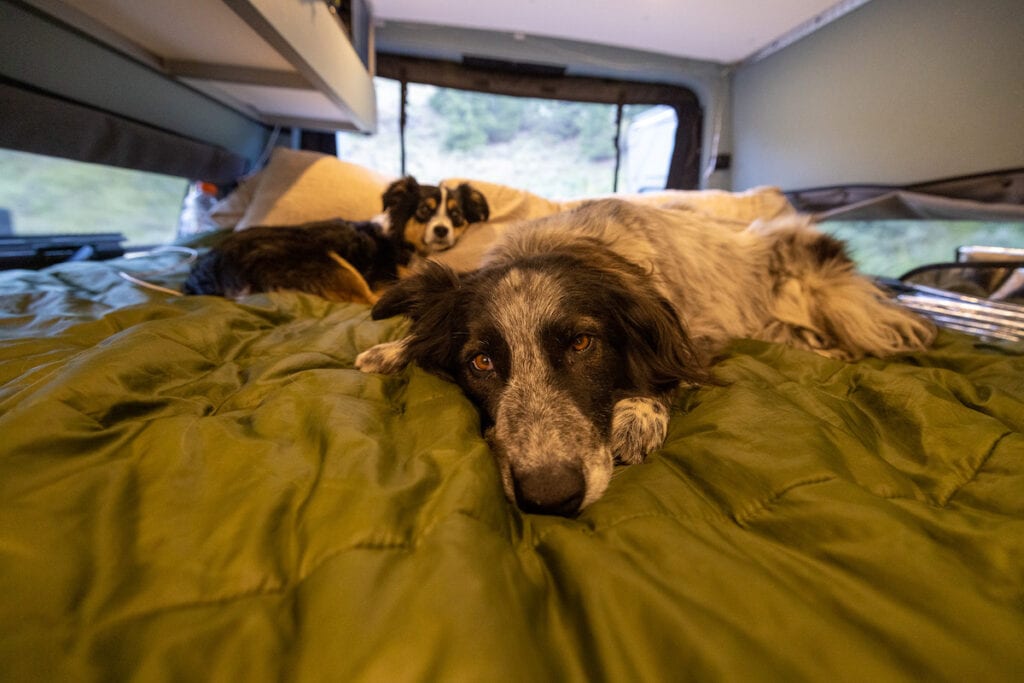
This cupboard hangs over Ryan’s facet of the mattress and our canine Charlie typically sleeps beneath it.
Sprinter Van Storage
Beneath the mattress is a ton of storage within the space referred to as the van storage. Identical to I did for the closet, I measured this area fastidiously after which went to the Container Retailer and acquired light-weight bins that match completely within the space. I like storing stuff in bins as a result of they’re straightforward to tug out and swap out what’s in them primarily based on the season and the precise gear we want. The bins additionally don’t add a number of additional weight to the van like a strong drawer system would.
Proper now in our storage we have now room for all of our tenting and outside gear, sneakers, additional canine and other people meals, my Starlink, and different miscellaneous gear, with a number of room to spare.
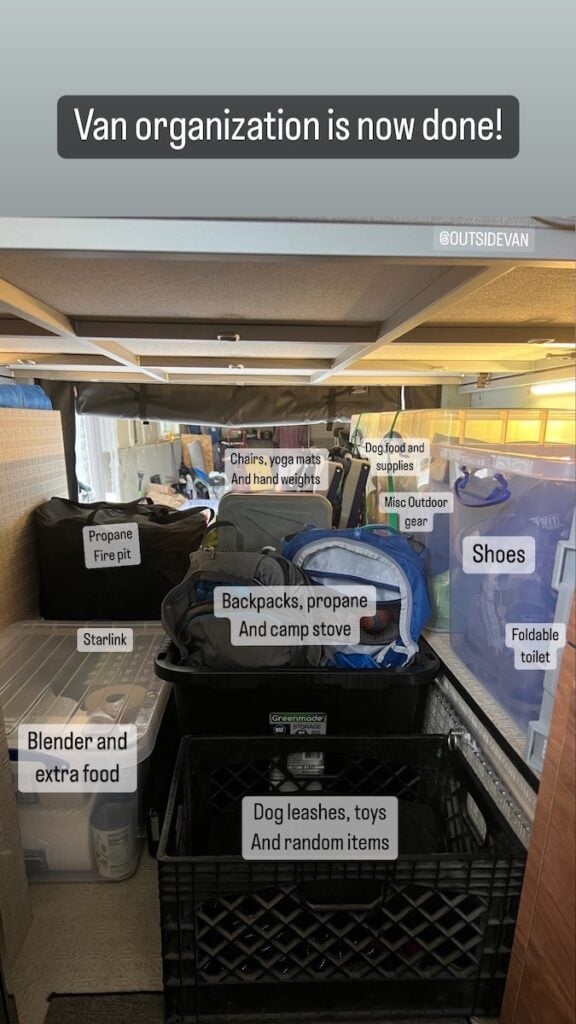
Outdoors Van additionally constructed a {custom} slide out gear tray that may we are able to use for extra bins, extra gear, or our two Specialised e-mountain bikes. With my being pregnant, we aren’t at present touring with our bikes, however the gear slider is particularly superior as a result of it makes it a lot simpler to load our bikes or bins into the again of the van. It additionally permits for simpler entry to gear bins with out having to crawl round below the mattress.
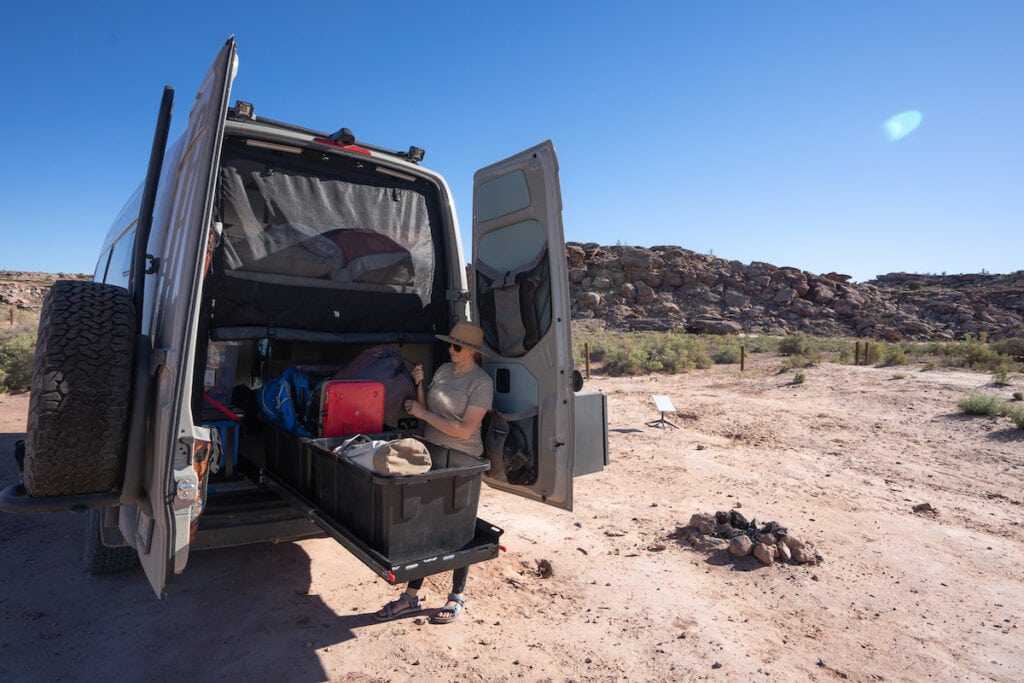
All the pieces will get secured within the storage utilizing Mac’s Versatile Tie Down System – mainly a model of L Monitor. Utilizing Mac’s tie-down rings, we cinch all of our bins up utilizing straps or bungees so nothing strikes whereas we’re driving. The bikes use the identical system. We merely take the entrance wheel off of our bikes, put the bikes in dealing with the other way so we are able to get them as tight as potential collectively, after which mount them to the Mac System utilizing fork mounts. It takes a couple of minutes to unpack and put the bikes collectively, but it surely provides me peace of thoughts with the ability to retailer our electrical bikes contained in the van to stop them from getting stolen or broken.
We will entry the storage by way of the again doorways or from the within of the van which was a necessity for me. I didn’t wish to need to go outdoors to the again of the van each time I wanted to entry one thing below the mattress.
Beneath the mattress, you’ll additionally discover our electrical system (driver’s left facet cupboard) and water tanks (passenger proper facet cupboard).
Sprinter Van Electrical System
In my very first van, I used to be all the time fearful about energy. I didn’t have sufficient battery storage or photo voltaic, and I discovered that to be very demanding. This taught me that it’s higher to overestimate your energy wants, which is what I’ve completed ever since.
My second Sprinter Van had excessive performing electrical parts with 660 watts of photo voltaic and 440 Ah of AGM batteries. The one time I fearful about energy was in winter if we had been parked someplace for every week with no solar. In any respect different instances, the system was lots satisfactory.

On this third van, I opted for most of the identical parts I had in my final van however a beefier system total. I additionally upgraded from AGM batteries to lithium.
We at present spend about 6-8 months straight dwelling in our van yearly and have quite a lot of digital tools we have to run. This contains electrical bikes, my laptop, digital camera, induction range, the heater, water heater, and different electronics.
Lithionics Battery System
On this new Sprinter Van conversion, we have now two 315 Ah Lithionics lithium batteries, for a complete of 630 Ah financial institution. The battery capability could be very straightforward to observe with a display screen proper above our galley that tells us how full it at present is.
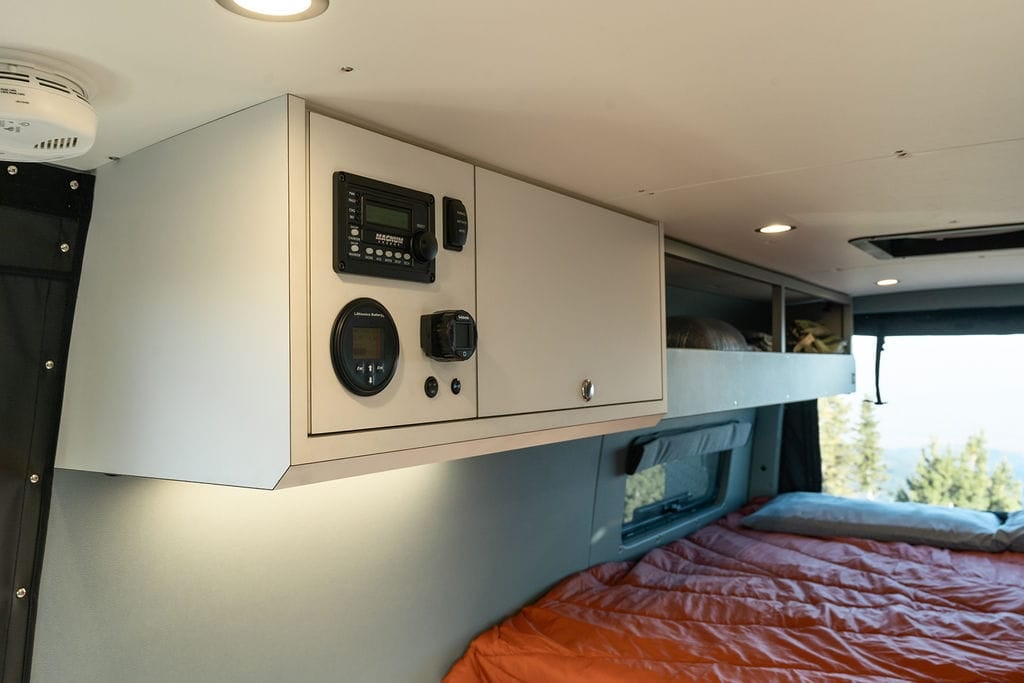
With lithium batteries, you should use 90% of the battery capability earlier than you should cost them (in contrast to AGM the place you’ll be able to solely use 50% earlier than you threat damaging the batteries). With the intention to stop injury in my present van, every Lithionics battery has a security constructed into it. As soon as the batteries are depleted to the ten% mark, the system will shut off as a reminder that the batteries have to be charged – which is so simple as turning on the ignition within the van as a result of our secondary alternator.
Outdoors Van makes use of the Lithionics system for numerous causes. First, it is without doubt one of the few lithium methods which offers you a exact and correct SOC (State of Cost) studying. Second, lithium batteries generally have a tough time charging under freezing. To resolve this subject, the Lithionics batteries have an inner heating blanket that routinely activates if the temperature of the batteries ever drops under 34°.
Up to now, I’m extremely impressed with my system. In 5 weeks on the street, our batteries by no means dropped under 75% capability which suggests we should always by no means have to fret about working out of energy.
Secondary Alternator
In my second Sprinter, the batteries had been related to the car’s alternator so they might cost whereas I used to be driving, however solely after the car’s battery was fully charged.
In my third Sprinter Van conversion, Outdoors Van put in a secondary 280XP Alternator Equipment with a Wakespeed Regulator. This secondary alternator is devoted to charging the home batteries, which begins as quickly because the car engine is turned on. It prices the batteries extraordinarily quick. In my actual world expertise to date, it appears to be like like it could actually add 10% cost for each 20 minutes of driving, so we virtually all the time arrive to our campsite with our batteries fully full.
Photo voltaic Panels
On the roof, I’ve 310 watts of photo voltaic panels made by Zamp Photo voltaic. They’re the identical model I had on my final van, and Outdoors Van makes use of Zamp as a result of their panels are made proper right here within the US, and out of the businesses they’ve tried, they’ve discovered Zamp’s panels to be the very best performing. I’ve two 90-watt panels and one 130-watt panel.
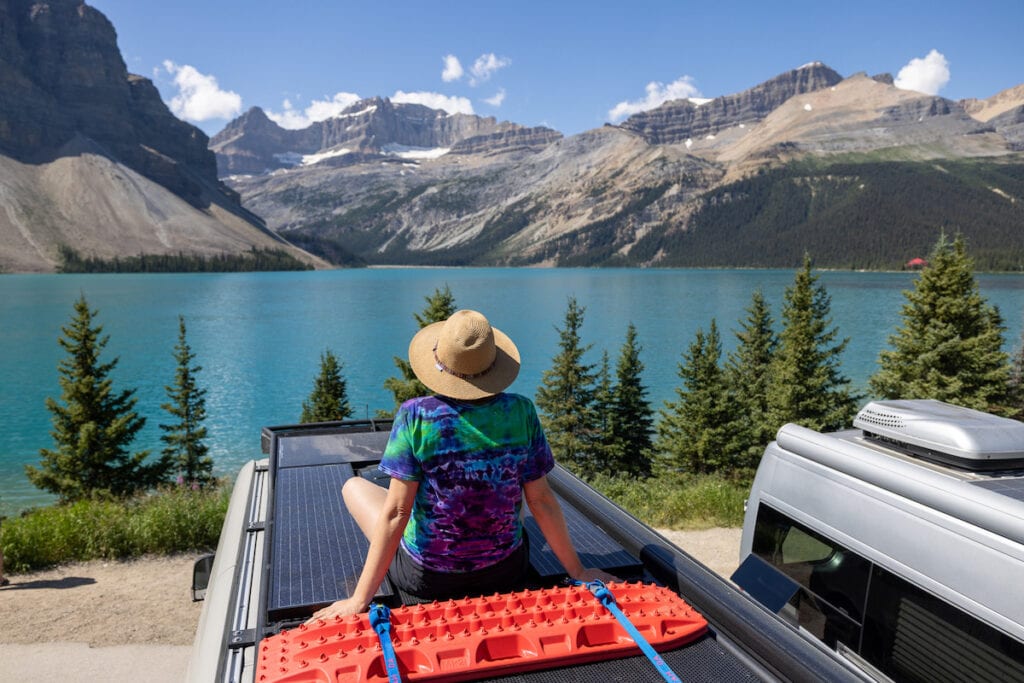
As a result of elevated capability of my batteries and the effectivity of the secondary alternator, I used to be in a position to barely downsize my photo voltaic system and acquire again some roof area. The principle goal of the photo voltaic now’s to maintain my batteries topped off if we’re parked for a number of days.
>> Learn Subsequent: Planning your electrical system on your van conversion
Roof Rack
My photo voltaic setup on the roof is secured to a custom-made Outdoors Van roof rack. The rack could be very low profile, so you’ll be able to barely see it from the bottom, and it has a walkway down the middle of the van that I exploit to hang around or entry the photo voltaic panels for cleansing. It really works out nice as a platform for taking pictures too.
One other neat function of the roof rack is it has 4 rows of Mac Monitor which makes it very straightforward to safe gear to the roof of our van.
Inverter
The ultimate piece of our van’s electrical system is the inverter. I’ve a 2000 watt Magnum Pure-Sine Inverter which converts energy from the batteries to AC energy that I exploit to run the induction range and different issues that plug into the 110 retailers. I’ve 6 USB retailers and 6 common 110 retailers, together with two 110 retailers within the storage that we use to cost our e-bikes. They’re positioned all all through the van so charging is all the time handy.

Temperature Management in my Sprinter Van Conversion
The temperature in our Sprinter Van is managed with two ceiling vans, window vents, and a diesel run heater. I opted in opposition to a rear AC in my Sprinter Van conversion which might cool the dwelling space even when the car will not be working. Whereas temperatures appear to be getting hotter yearly within the mountains and a rear AC unit sounds very nice, they draw a ton of energy. Since we prefer to be off the grid as a lot as potential, an AC unit didn’t seem to be one of the best match for our way of life. After all, for those who plan on dwelling in Florida or Arizona in summer season, you could must plan otherwise.
Outdoors Van did do a number of issues although to maintain the inside of the van snug, even on sizzling sunny days.
Vented Home windows
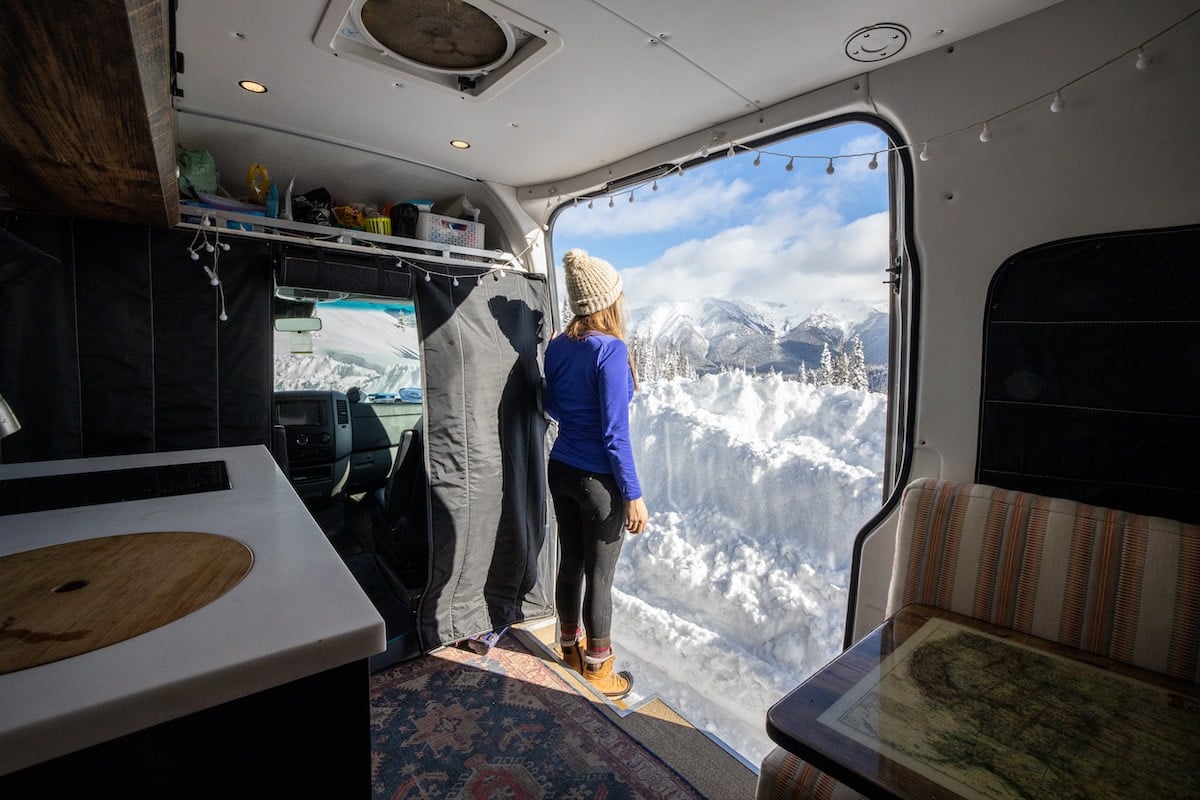
First, they changed the entrance facet manufacturing facility home windows with CR Laurence Home windows that vent. Subsequent to the mattress, we even have small slider home windows that pop open.
Ceiling Followers
I’ve two Maxx Followers. One above the galley and one above the mattress. They every have a rain sensor and create very nice airflow within the van. We sometimes have one pulling air in and the opposite pushing air out.
Insulating Window Shades
All the window shades in my Sprinter van conversion are product of a Sunbrella materials with a layer of closed cell foam within the center which helps insulate the van from the warmth in the summertime and prevents heat air from escaping by means of the home windows within the winter. The shades are quite simple to place up and take down by way of the snap buttons and more often than not, we discover ourselves driving with them in place to maintain the solar out.
I even have a full set of Outdoors Van window coverings that cowl the entrance, driver, and passenger home windows. These are very straightforward to place up, and we use these each night for privateness and to dam out the morning solar.
To assist regulate the temperature through the day after we are out on hikes or away from the van, we use this insulated tender wall curtain that separates the cab from the dwelling space. This tender wall is extraordinarily efficient at protecting the warmth within the cab from getting into the again of the van through the day. Sometimes within the evenings, we use our entrance window masking as an alternative of this tender wall with the intention to use our swivel seats, but when it’s only a fast evening stealth tenting someplace, this tender wall is available in actually useful. There may be additionally a center portion that zips up that creates a walkway from the entrance to the again of the van.
Sprinter Van Heater
My Sprinter Van conversion makes use of the Webasto Air Prime EVO 40 Heater to warmth the air within the van. This can be very environment friendly and produces a major quantity of warmth in as little as 6-8 minutes. The perfect function is an auto perform that means that you can digitally set the temperature and as soon as the ambient air in a van reaches that temperature, the system idles till the temperature drops once more.
It additionally has a timer mode that means that you can set a day, time, and length for the heater to run, even when you find yourself not there. On a ski day, this lets you exit and return to a heat van with out having to warmth it the entire time you might be gone from the van. We’ve solely used the van within the sizzling summer season to date, however we have now briefly examined the heater, and it really works very nicely.
Sprinter Van Plumbing System
It’s normal at Outdoors Van to have all the plumbing contained throughout the van, slightly than having tanks and pipes working on the surface. That method the system is extra insulated for 4 season use. The plumbing in my third Sprinter Van conversion is streamlined and easy to make use of. For a complete publish all about water tanks, bathrooms, showers, and extra, go right here.
Water Tanks
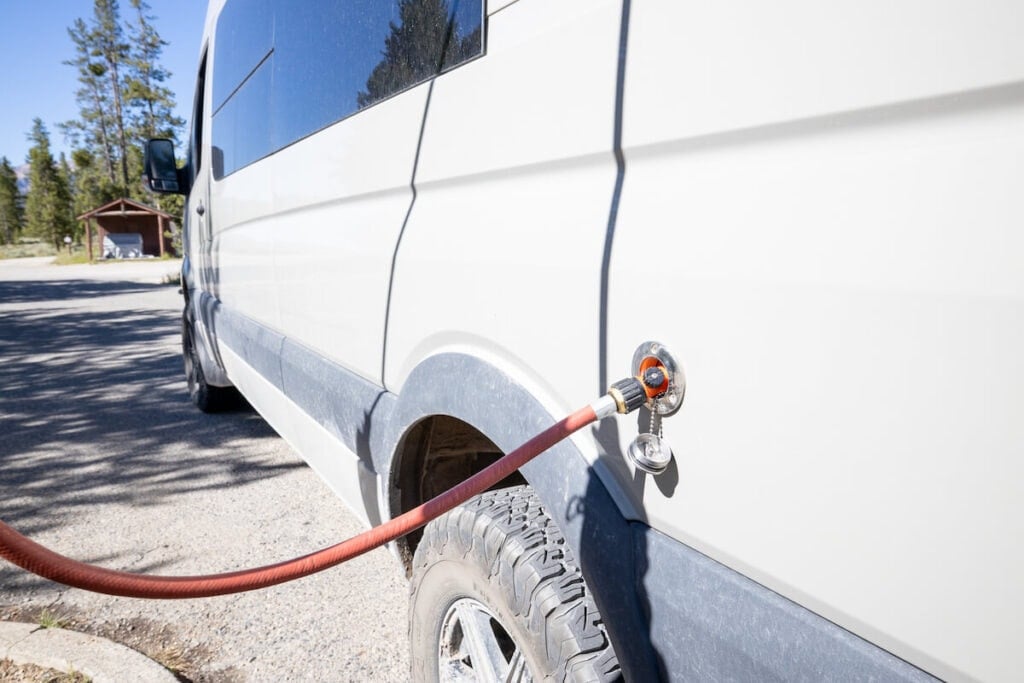
I’ve a 28-gallon water tank inside a driver’s facet cupboard within the storage. The BPA-free water tank is everlasting, however it could actually simply be crammed utilizing a hose or 5-gallon jugs if I can’t discover a spigot with potable water. Fortunately that’s by no means been a difficulty. If we aren’t showering, 28 gallons will final us between 8-10 days. Study the place to refill your water tanks on this publish.
To fill the tank, we simply join the hose to the spigot and stick the hose within the inlet on the surface of our van.
Beneath the sink, there’s a very primary water filter. With the intention to be sure that the water we’re ingesting is protected, I not too long ago invested in a three-stage Clearsource Extremely RV Water filter system that filters out viruses, micro organism, sediment, unhealthy style, and even heavy metals. It was costly, however contemplating we depend on public water sources (with pipes which can be probably very previous) greater than half the 12 months, I wished some additional safety for the sake of my long run well being.
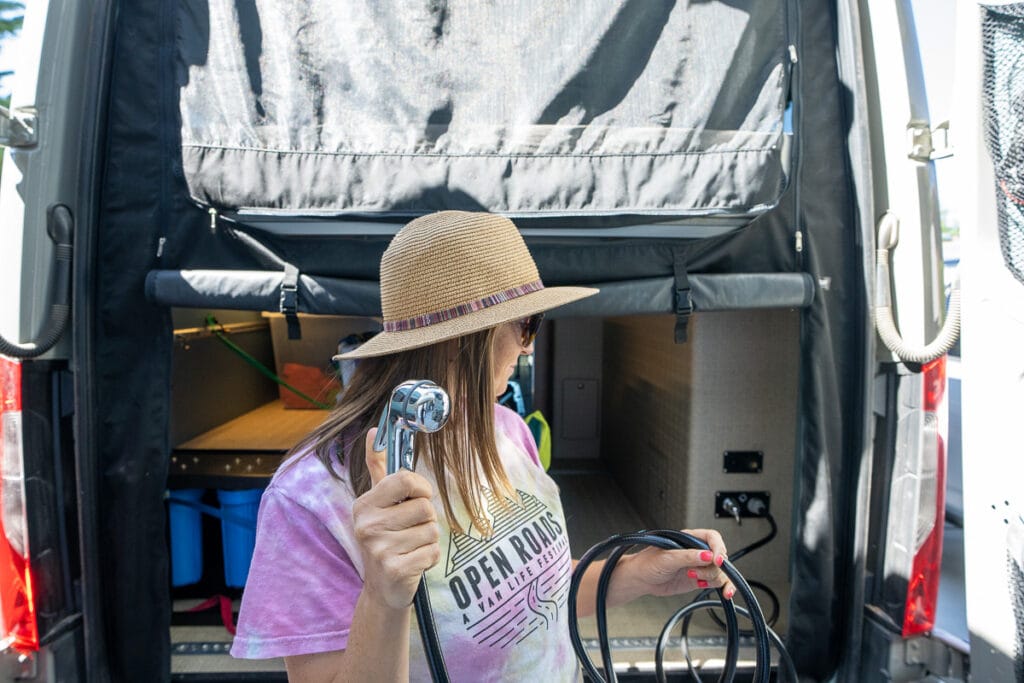
Water Heater and Out of doors Bathe
The water heater in my latest Sprinter Van conversion is completely different than what I had in my final two vans. In my earlier vans I had the Webasto Twin Prime Evo 6 which heated the new air and water by siphoning a little bit of diesel from the van’s fuel tank. It did the job, but it surely took about half-hour to warmth the water and the boiler might solely warmth 3 gallons of water at a time. Consequently, we didn’t actually use it that a lot.
On this van, I’ve the Rixen Espar Hydronic system which is a furnace that heats a closed loop of coolant. Then a warmth exchanger is used to switch the warmth from the coolant to the new water.
This technique has a number of benefits. First, the new water is out there inside 5 minutes of beginning the unit. It additionally heats the water hotter, and through the use of a mixer valve, we are able to high-quality tune the temperature of the water that comes out. Lastly, the system will constantly warmth the water till you flip it off. Which means, as soon as the system is sizzling, we might warmth all 28 gallons in our water tank. We probably wouldn’t try this, but it surely’s good to know if we wished to take an extended bathe, we might.
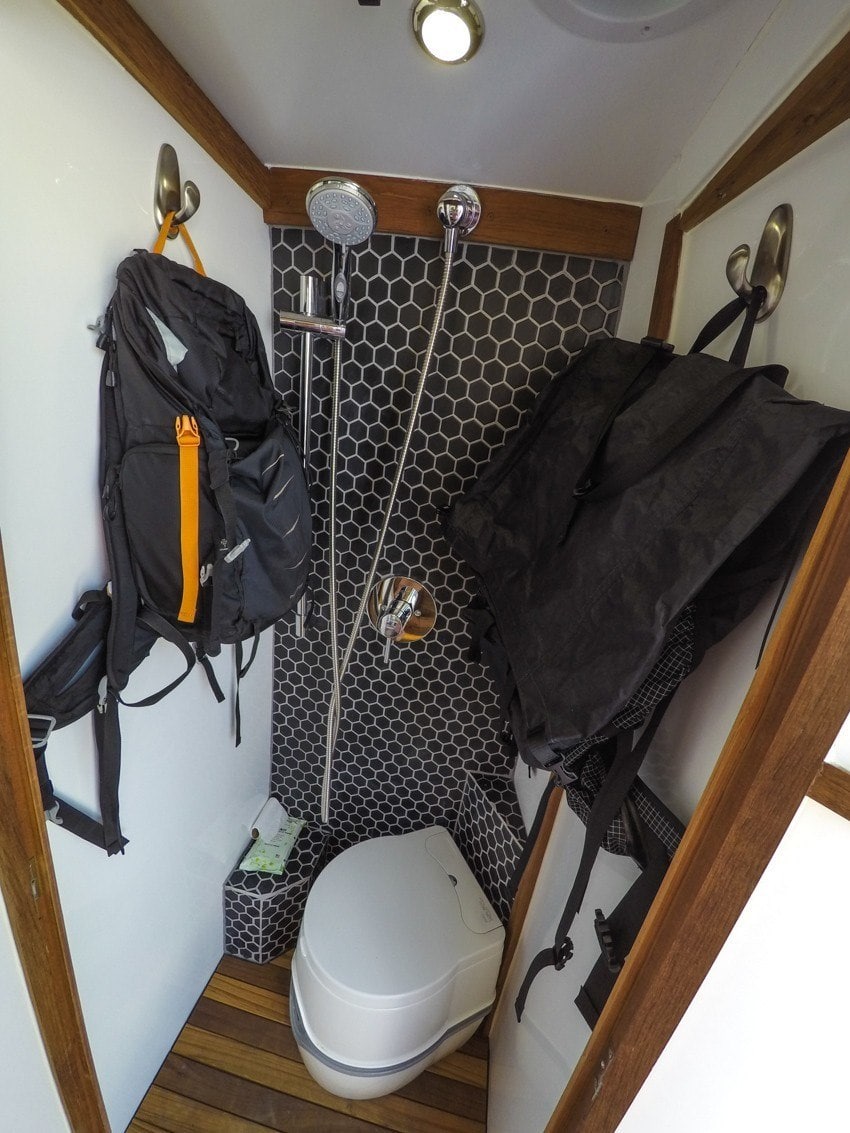
For the bathe, Outdoors Van does construct light-weight indoor showers for these of you who really want a daily indoor bathe…however primarily based on my expertise with the indoor bathe in my first van, I made a decision this wasn’t a necessity for me or well worth the sacrifice in area.
For showering, we are able to shortly hook up a bathe hose to the again of the water tank, which permits us to take sizzling outside showers. Nevertheless, since we prefer to preserve our water, most of the time, we take showers at gyms, neighborhood facilities, campgrounds, or homes of household or mates. I’m going to get considered one of these moveable pop up bathe privateness tents although and I feel it is going to incentivize me to make use of this outside bathe extra.
Collapsible Rest room
In my first Sprinter Van, I had a Thetford moveable rest room. It did the trick, however I hated utilizing it for #2 as a result of dumping it was gross. Plus, discovering a dump each 5 days to empty the bathroom was a trouble.
In my second and third van, we ditched the moveable rest room and now depend on pee jars for #1 and this foldable Go Anyplace rest room that makes use of wag baggage for #2 when a public rest room isn’t accessible. The bathroom folds up actually small so it doesn’t take up as a lot room as a cassette or composting rest room. When you’re completed doing your online business, the bag simply goes in any outdoors trash can.
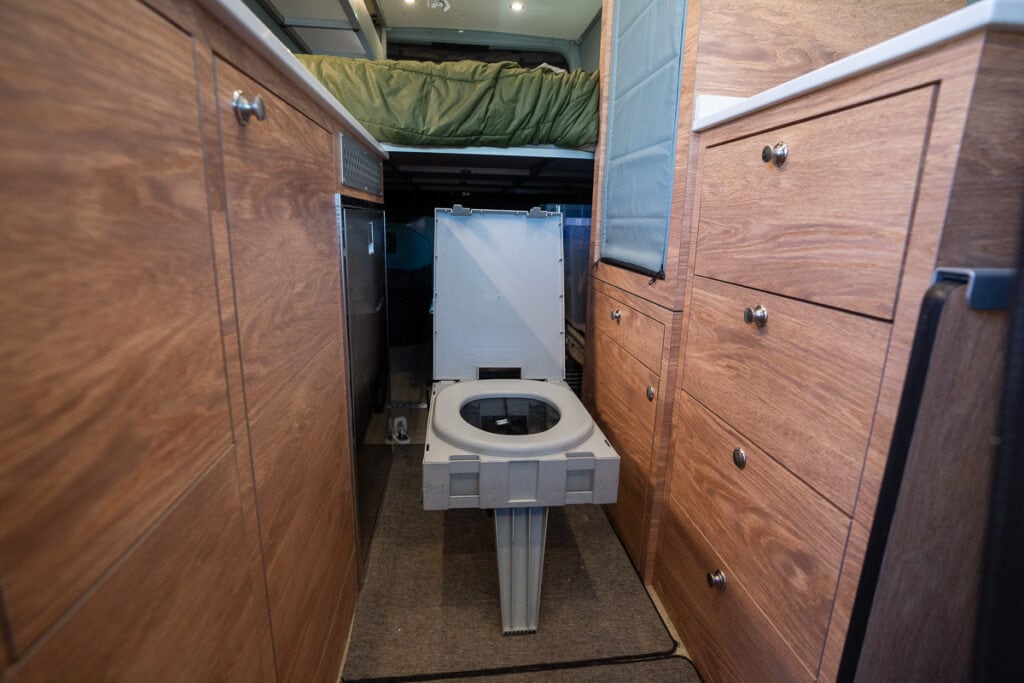
The baggage do get expensive, and I’m not loopy concerning the plastic waste, however for the occasional use, it’s labored out nice for us. The area we save by not having a standard rest room is greater than value it, and I take pleasure in not having the toilet-related chores. Evaluate one of the best rest room choices for van life on this weblog publish.
A notice on bathrooms: When at dispersed campsites, I used to dig a gap and go poop outdoors in accordance with Depart No Hint ideas. Nevertheless, as our public lands have gotten extra crowded and over-used, I now not really feel that it is a accountable possibility for individuals who spend important quantities of time on the street. That was an enormous think about our choice to start out carrying the Go Anyplace rest room that we have now in our van.
Sprinter Van Ground
Now on my third Sprinter Van conversion, I’m satisfied that there are only a few flooring choices that keep wanting clear when you find yourself dwelling in and utilizing the van for outside adventures.
In my first van, I had darkish laminate wood flooring. They appeared nice clear, however grime confirmed very simply on darkish colours and with our canine, all we noticed was footprints. The laminate additionally felt slippery and didn’t present any traction.
In my second van, I had a excessive density vinyl weave within the dwelling space. It was a beige colour with texture, and I believed the grime would mix proper in, however I used to be unsuitable. Like my first van, it confirmed grime actually simply and was much more tough to scrub as a result of weave.
In my third van, I selected a Lonseal vinyl product that has a bit texture for grip, however no grooves that lure grime. This time I went with a grimy brown colour with specks. When it’s clear, it appears to be like fanastic, however once more, with canine it’s almost unimaginable to maintain it wanting good.

Our interim answer has been to cowl the whole flooring with some grey door mats I acquired at Goal that I can simply vacuum. My long-term plan is to get a set of {custom} flooring mats made by Inhabit Design Works that you may take away and hose off. In addition they present cushion and a few additional insulation, and that is the primary improve I plan to make.
So far as flooring set up, the very first thing Outdoors Van does when constructing their flooring is to take away the manufacturing facility flooring. They then construct a brand new flooring out of marine grade plywood and cling a layer of high-density vinyl to the highest. That is barely heavier than the manufacturing facility flooring, but it surely’s a bit thicker and far more sturdy, so there’s no flex within the flooring while you place heavy options on it.
>> Learn Subsequent: A Information to Ground Supplies on your Van
Tires and Suspension
We do a number of off-roading in our Sprinter Van, so having a superb all-terrain tire and upgraded suspension was important.
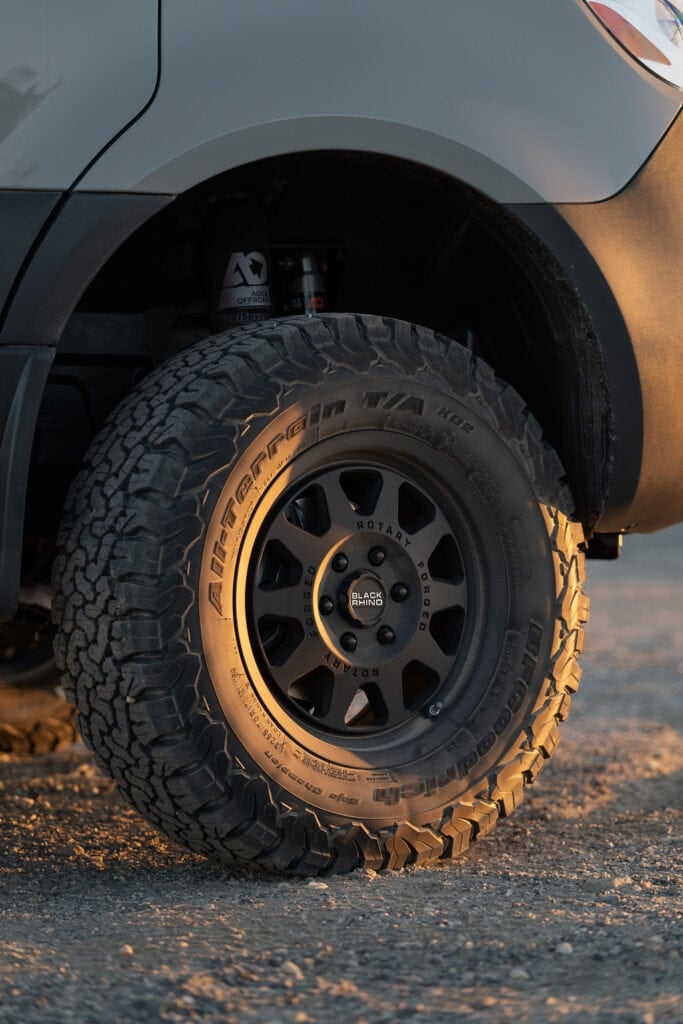
Tires and Wheels
Like my final van, the tires are the BF Goodrich K02 265/70/R17. They carry out nicely on rocky roads, snow, and even in muddy circumstances (with the best driving abilities).
The wheels are Black Rhino Stadium 17″ Wheels, that are one inch larger than the inventory wheels that the van comes with. I selected these particular wheels as a result of they’ve a heavy obligation load score at 2,450 lbs/wheel.
Agile Offroad RIP Equipment Suspension Improve
The inventory suspension that the Mercedes Sprinter Van comes with will not be supposed for going off-road or dealing with bumpy terrain. In bumps, windy circumstances, and even pulling out of the driving, a transformed Sprinter Van with inventory suspension will expertise an unnerving quantity of sway. That’s why upgrading the suspension is without doubt one of the greatest issues you are able to do if you wish to enhance the efficiency and total really feel of the trip. Upgrading the suspension can be vital while you’ve added a number of weight to the van.
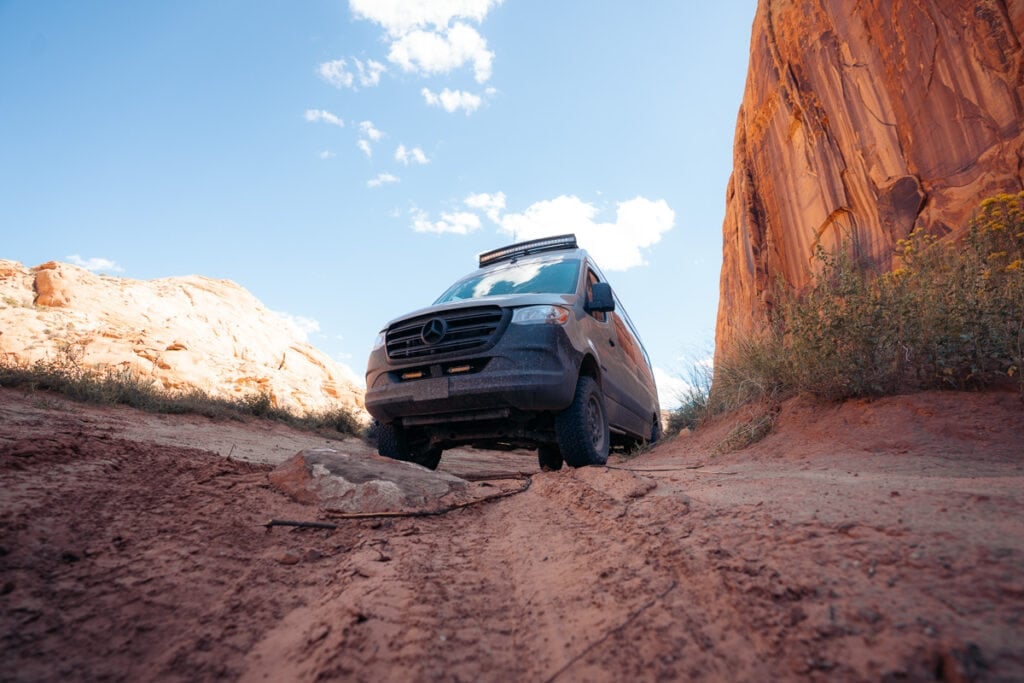
In my third van, I selected the Agile RIP Equipment for the upgraded suspension bundle which has fully remodeled the driving expertise. Within the entrance, a coil over spring is added to the manufacturing facility McPherson strut, together with an upgraded Fox shock. The result’s an amazing distinction in how the van handles weight shift round corners, improved dampening within the bumps, and the van responds extra shortly to the motive force’s controls.
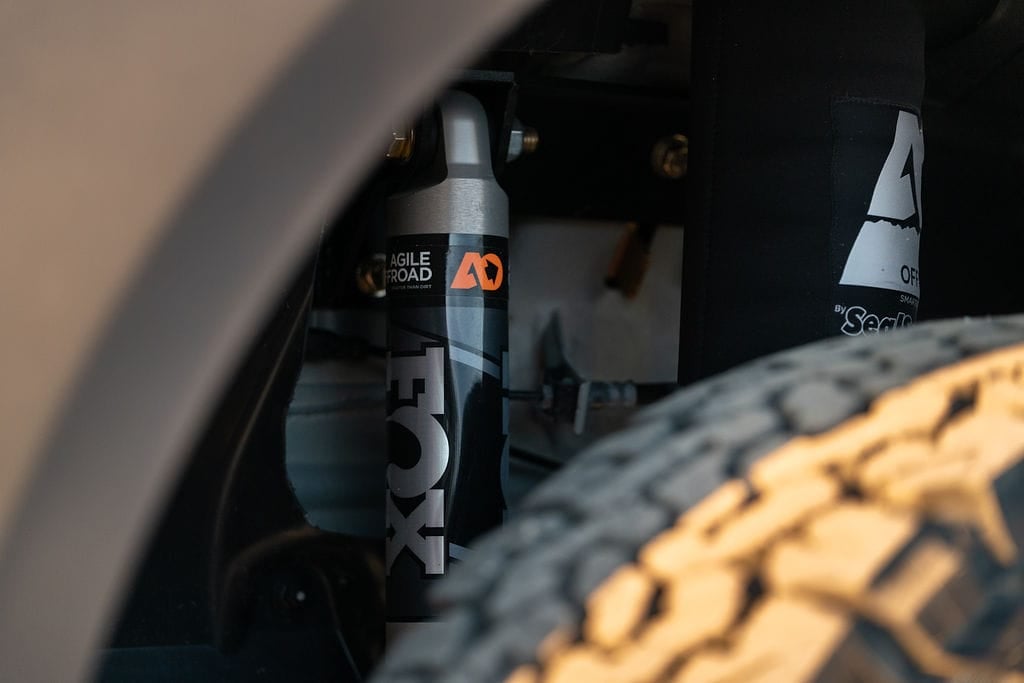
Within the rear, the manufacturing facility leaf spring system is changed with a progressive six leaf spring system, and also you selected a load primarily based in your rear axle weight so the system is personalized. This will increase the payload functionality and removes any sagging within the rear of the van. It additionally leads to a smoother trip as a result of progressive nature of the springs. There may be additionally an extra Fox shock added within the rear, once more for improved dampening of the motion. The results of the shock is that the van sways a lot much less facet to facet over uneven terrain, particularly with the excessive roof Sprinter Van.
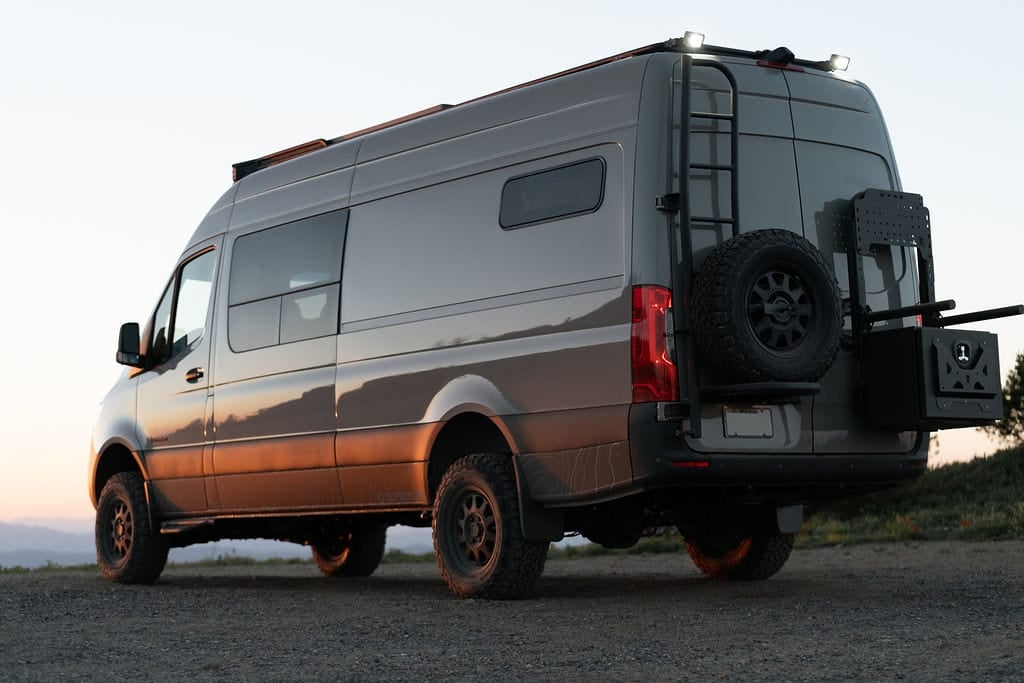
Owl Engineering Rear Equipment
All the rear aluminum equipment on the van are made by Owl Engineering. The principle motive I selected Owl for my rear equipment is that you simply don’t need to first swing out the field and spare tire earlier than opening the rear doorways. As an alternative, all the Owl Engineering gear on the rear opens routinely while you open the again doorways.

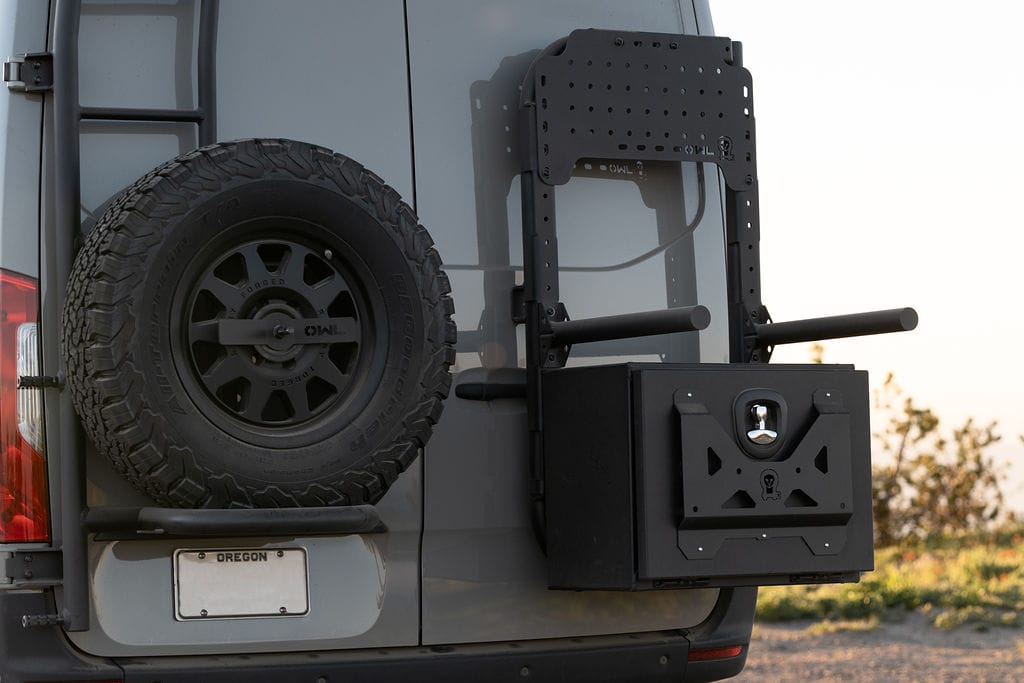
B2 Provider, Mini Sherpa, and Medium Expedition Field
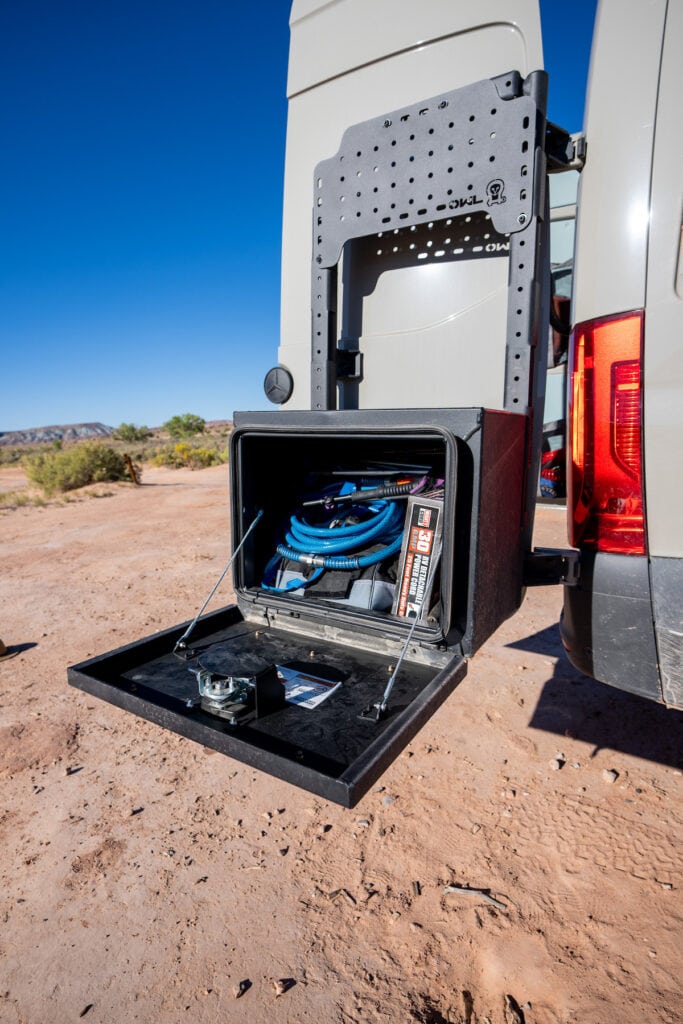
The B2 Provider is a modular storage system designed by Owl Engineering that may be personalized relying in your storage wants. On the underside, we have now the Medium Expedition Field the place we retailer our shore energy hookup, hoses, instruments, trekking poles, and different soiled gear with the intention to hold the within of the van cleaner.
Above the B2 Provider, we initially had Owl’s Bike Mounting Tubes that may permit us to hold our e-bikes on the surface of the van if we select utilizing 1Up Bike Trays. The benefit of carrying your bikes on the B2 provider slightly than a hitch mount is that you simply don’t lose any floor clearance and it additionally doesn’t cut back entry to your again doorways. Additionally, I like that Owl has designed their bike provider to deal with the load of e-bikes, that are rather a lot heavier than regular mountain bikes. Resulting from my being pregnant, we determined to depart the bikes at residence for the close to future, so we eliminated the mounting tubes for now.
On the high of our B2 Provider, we have now Owl’s Mini Sherpa Plate. This offers us the choice to mount quite a lot of restoration instruments – corresponding to an ax, shovel, a spare Rotopax diesel canister, and even our Maxtrax restoration boards if we had been to take away the Expedition Field on the underside.
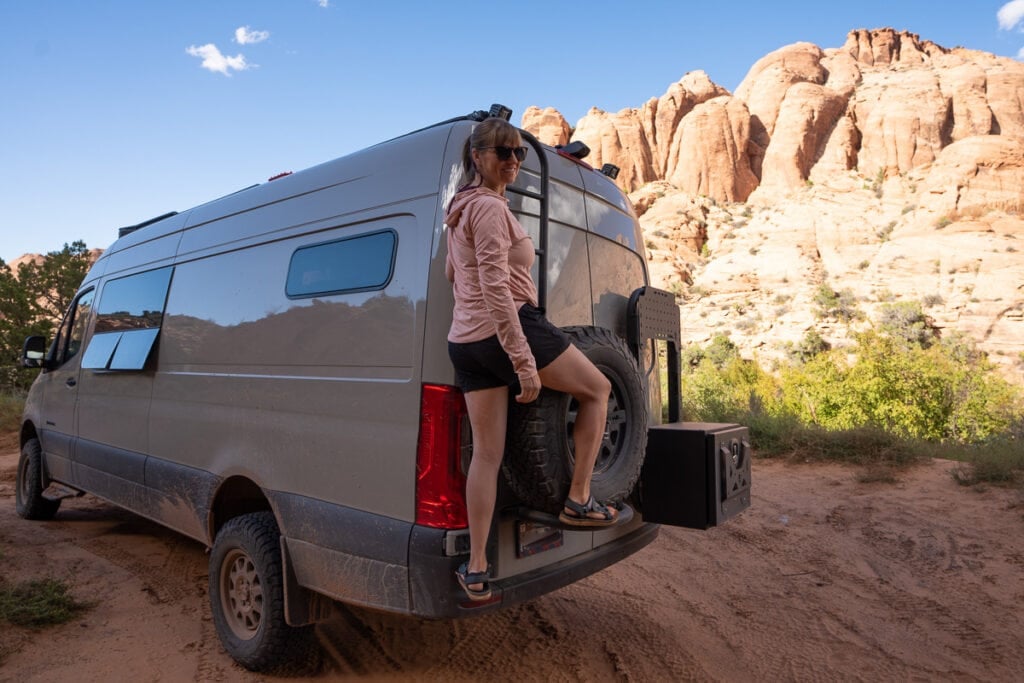
Owl Ladder and Spare Tire Rack
On my earlier two vans, I had the spare tire saved beneath the van within the manufacturing facility spot. With all the off-roading we do, I made a decision that having the spare tire beneath the van may not be the best place to entry it if we acquired in a pickle on a dust street.
The Owl Ladder + Tire Provider supplies an answer to this by combining a ladder and spare tire rack on the again door. The tire provider permits us to hold a full sized 17″ spare that’s an identical to the remainder of our tires. The ladder/tire combo rack solely weighs 25 kilos and once more the again doorways can open with out having to swing out the rack first.
The ladder is streamlined and has pegs that reach under the spare tire rack that you simply use to rise up on the ladder. I’ll say it’s a bit tricker the primary couple of instances to step up onto than a conventional ladder, however when you get the dangle of it, it’s fairly straightforward.
Rolef Bug Screens
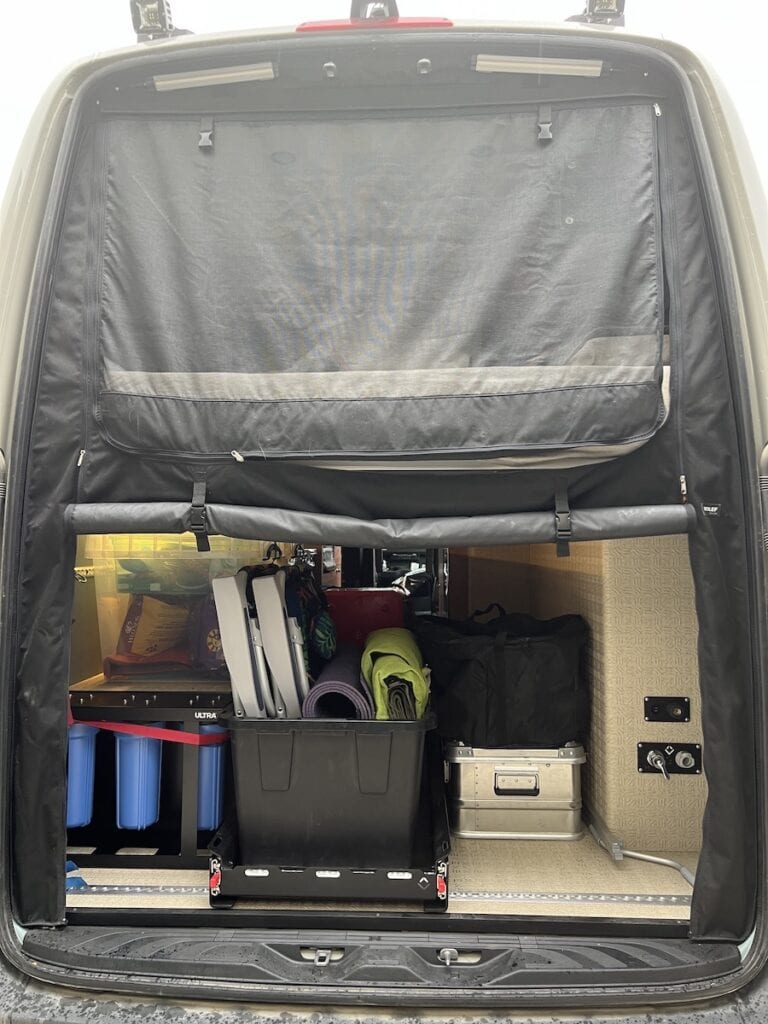
In my earlier two Sprinter Vans, we didn’t have bug display screen answer. We tried a number of completely different manufacturers, in addition to some make shift choices with magnets that we purchased off Amazon. Nothing actually labored or was very handy to get out and in of the van.
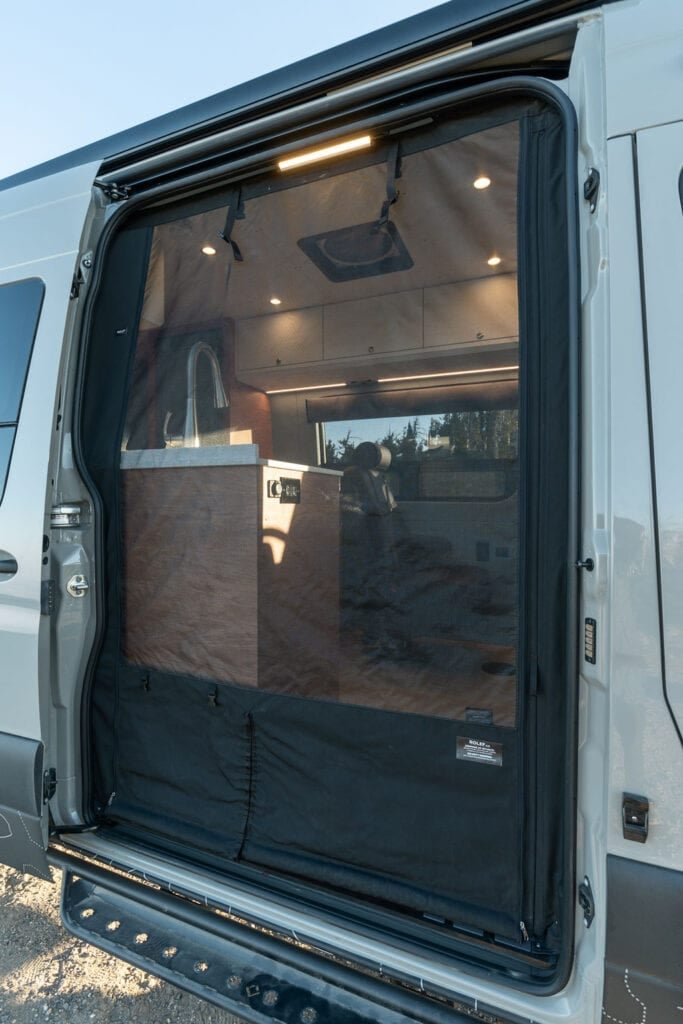
For my third Sprinter camper van, I knew I wished the Rolef bug screens. They’re pricier than the opposite choices, however with the ability to hold the doorways open after we had been not too long ago in Canada was priceless. The mosquitos had been completely brutal, however we had been in a position to hold our slider and rear doorways open on these sizzling summer season evenings and hold the within of our van bug free.
The Rolef bug screens are completely put in, however you’ll be able to roll them up while you don’t wish to use them. There are easy clips on the high that maintain them up.
On the rear bug display screen, the highest half is display screen, and the underside half which you’ll roll up individually is stable. This lets you entry your gear within the storage whereas protecting the mattress space bug free.
On the slider door, while you wish to use the bug display screen, you unclip it and zip it down. Then to simply get out and in of the van, there’s a magnetic strip that means that you can shortly open and shut the best facet with out having to take care of the zipper. It’s a reasonably nice design and I’m so glad we have now them.
Sprinter Van Awning
On my second Sprinter Van, I made a decision in opposition to a everlasting awning as a result of I wished as few issues as potential hanging off of the van. As an alternative, we used the MoonShade which is a transportable, budget-friendly shade answer that units up fairly shortly (you’ll be able to learn my full overview of the MoonShade right here).
In my third Sprinter, I opted for a Fiama awning. We’ve used it a number of instances to date, and I feel a everlasting awning has its execs and cons. It’s faster and simpler to arrange, and I do suppose it supplies extra shade than a few of the moveable choices as a result of the truth that you’ll be able to regulate the angle.
Nevertheless, with a everlasting awning, it’s important to be very cautious and pull it in if it will get windy, and there are additionally a number of elements that may break. We’ve solely used ours a number of instances, and we’ve already been having some points making an attempt to shut it. There may be additionally the added value of a everlasting awning, so it’s important to actually take into consideration how a lot you’ll use it and whether or not or not it’s value it.

Thanks for studying by means of my Sprinter Van conversion weblog publish. You possibly can watch the excursions of all three of my vans on YouTube so you’ll be able to see how they’ve advanced over time. Be sure that to subscribe so that you get notified of any future movies.
Learn Subsequent:
Acquired questions on my Outdoors Van Sprinter Van Conversion? Depart a remark under and you’ll want to join our van life publication.