
Auto ISO is a digital camera characteristic that newcomers are likely to ignore–however it is a mistake.
Why?
As a result of Auto ISO is likely one of the most helpful strategies for exposing photographs appropriately whereas additionally reaching pictures which can be tack-sharp.

On this article, I goal to elucidate every little thing you might want to learn about Auto ISO. By the point you’re completed, you’ll be capable to use Auto ISO with ease, and also you’ll know when it must be applied for one of the best outcomes.
Let’s get began.
Publicity Triangle and Taking pictures Modes
If you wish to seize nice pictures, then it’s a must to grasp publicity.
In different phrases:
You want to have the ability to produce pictures with important element, with out blown-out highlights and clipped shadows.
Publicity Elements
Now, there are three most important elements of publicity:
Shutter velocity.
Aperture.
And ISO.
Collectively, these three variables decide the brightness of your photograph.
They’re represented within the publicity triangle, the place adjusting any of the variables leads to a shift in publicity:
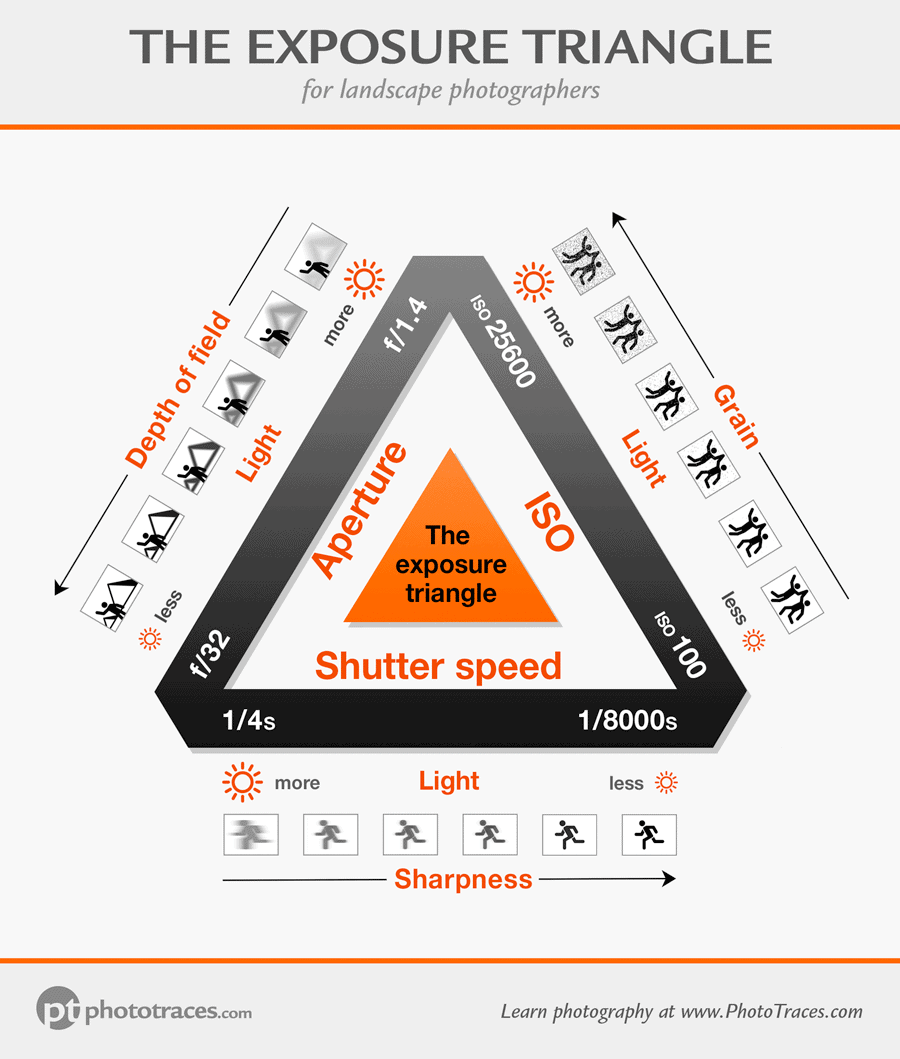
Shutter Pace and Publicity
Particularly, by dashing up your shutter velocity, the digital camera captures much less mild, leading to a darker photograph; by slowing down your shutter velocity, the digital camera captures extra mild, leading to a brighter photograph.
Aperture and Publicity
By widening your aperture, the digital camera captures extra mild, leading to a brighter photograph; by narrowing your aperture, the digital camera captures much less mild, leading to a darker photograph.
ISO and Publicity
And by elevating your ISO, your pictures turn into brighter; by dropping your ISO, your pictures turn into darker.
As you may see, deciding on the precise aperture, shutter velocity, and ISO entails making an allowance for all three variables and their results on the general photograph.
So in order for you a darker picture, you may enhance your shutter velocity, drop the ISO, or slim the aperture. And in order for you a lighter picture, you do the reverse.
Easy, proper?
In some methods, it’s. However right here’s the issue:
Every of those publicity variables additionally impacts different elements of your pictures, as is mirrored within the three key capturing modes:
Aperture Precedence
Aperture Precedence mode means that you can set the aperture, whereas your digital camera selects a corresponding shutter velocity (for a superb publicity).
This can be a helpful mode, as a result of the aperture controls the depth of subject (i.e., the quantity of the photograph that’s sharp).
The truth is, Aperture Precedence is the most well-liked mode amongst photographers; it’s beloved by panorama photographers, road photographers, and portrait photographers alike.
Shutter Precedence
Shutter Precedence mode means that you can set the shutter velocity, whereas your digital camera selects the corresponding aperture.
Shutter Precedence is much less generally used than Aperture Precedence, however it might probably generally be helpful to decide on your shutter velocity prematurely.
Why?
As a result of the shutter velocity controls movement in your pictures. You may freeze the movement with the quick shutter velocity, or introduce movement blur when utilizing longer shutter speeds.
That’s why Shutter Precedence is helpful in conditions the place you require a selected shutter velocity to freeze a transferring topic for instance.
Guide Mode
Guide mode means that you can management each the aperture and the shutter velocity.
So that you set the aperture and also you set the shutter velocity.
Guide mode is nice for conditions the place each the depth of subject and the quantity of movement within the photograph are of nice significance (e.g., when capturing a deep depth of subject macro photograph at excessive magnifications).
What About ISO Precedence?
Technically talking, ISO Precedence mode doesn’t exist. However some photographers consult with Program mode as ISO Precedence as a result of it means that you can enter the ISO whereas the digital camera selects the aperture and shutter velocity.
I discover that the Program Mode is the least helpful one since you lose management over each Shutter Pace and Aperture. I by no means use it in my images.
What Is Auto ISO?
Auto ISO is a characteristic that means that you can enhance your flexibility when capturing.
Auto ISO is a digital camera perform that lets you choose a variety of ISO values, after which–when capturing within the subject–your digital camera will choose the bottom acceptable ISO worth for well-exposed photographs.
So with Auto ISO, you set a most and a minimal ISO worth, primarily based in your private preferences and your digital camera’s noise efficiency.
Then you definately set the minimal acceptable shutter velocity, primarily based on the kind of pictures you’re capturing and the gear you’re capturing with.
What Is the Minimal Acceptable Shutter Pace?
The minimal acceptable shutter velocity relies on two elements:
The velocity of your topic.
And the size of your lens.
The quicker your topic, the upper the shutter velocity will should be to forestall movement blur.
And the longer your lens, the upper the shutter velocity will should be to forestall digital camera shake.
On some cameras, you’ll have to manually choose your minimal shutter velocity, primarily based–on the very least–on a easy reciprocal guideline, the place you select a minimal shutter velocity that’s the reciprocal of your lens’s focal size.
(So in case your lens is 100mm, you’ll need a minimal shutter velocity of at the least 1/100s.)
However some cameras will calculate a minimal shutter velocity for you, primarily based on this reciprocal guideline.
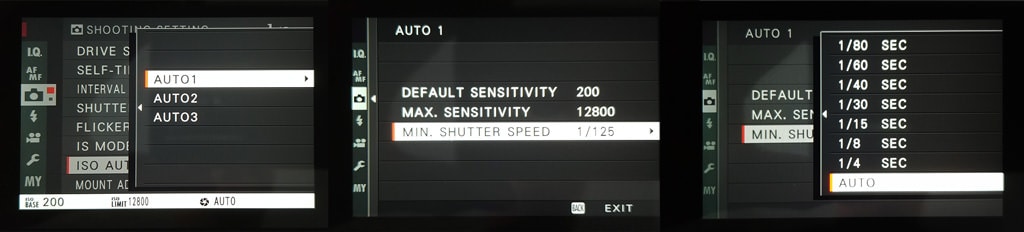
Fujifilm Auto ISO Menu Settings
Listed below are the Fujifilm cameras Auto ISO menu settings.
You’ve got the choice to specify the Minimal Sutter Pace. In my case, it’s set to 1/125s. Or you may change to the AUTO mode and let the digital camera calculate the minimal acceptable shutter velocity primarily based on any given focal size.
Auto ISO in Aperture Precedence Mode
In Aperture Precedence mode with Auto ISO, you choose the aperture.
Your digital camera then selects the shutter velocity for the proper publicity, whereas utilizing your lowest indicated ISO because the ISO worth.
As soon as the shutter velocity is pressured all the way down to its minimal acceptable worth (i.e., the worth mentioned within the earlier sections), your digital camera will begin to elevate the ISO till it reaches the utmost ISO in your vary.
Aperture Precedence with Auto ISO is an especially helpful mode for conditions the place you will have altering lighting and also you don’t wish to should fiddle round together with your ISO settings. Merely set the aperture you want and your minimal shutter velocity. Then let your digital camera do the remainder of the work, guaranteeing that you simply get sharp, well-exposed outcomes with the bottom possible ISO setting.
So in the event you’re doing handheld panorama images and transferring out and in of shade, you may set your aperture worth primarily based in your required depth of subject, then let your digital camera decide the correct shutter velocity and ISO for one of the best picture high quality.
Auto ISO in Shutter Precedence Mode
In Shutter Precedence mode with Auto ISO, you set the shutter velocity and the vary of acceptable ISO values, whereas your digital camera selects the ISO.
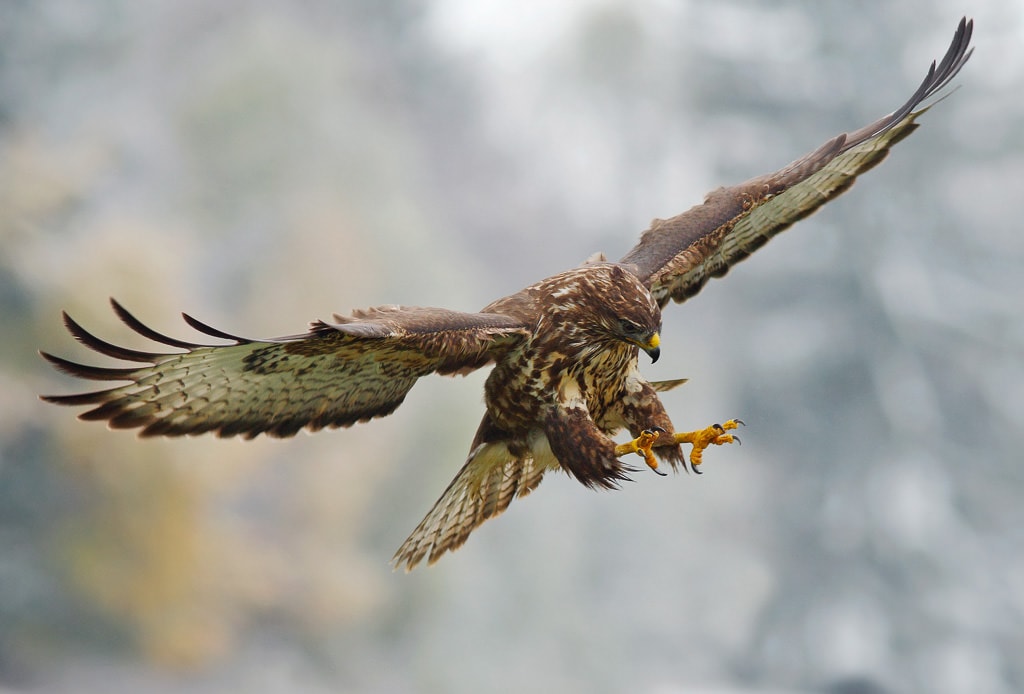
That is generally helpful when coping with fast-moving topics (e.g., a foraging chook); you’ll set a shutter velocity primarily based on the velocity of your topic, then let your digital camera select the correct aperture and ISO.
(On most cameras, the ISO will stay at your chosen minimal worth till the aperture can not go any decrease.)
That means, you’ll at all times get sharp photographs of the chook, with out having to fret about your ISO setting.
Auto ISO in Guide Mode
Auto ISO in Guide mode means that you can choose your aperture and shutter velocity, whereas your digital camera units the ISO primarily based in your vary of values.
That is one in all my private favourite choices, as a result of it means that you can management each the depth of subject and the sharpness of your pictures–however with out having to fret about adjusting settings as the sunshine adjustments.
So in the event you’re photographing an individual strolling out and in of the shadows, you may choose your supreme aperture and shutter velocity, with out having to fiddle with the ISO button/dial.
Ought to You Use Auto ISO?
Completely, it is best to! As you will have in all probability gathered, Auto ISO is a good characteristic that’s helpful in conditions the place the sunshine is altering quickly otherwise you don’t have time to regulate your settings in fast-paced conditions.
In my case, my Fujifilm XT2 digital camera is ready to Auto ISO more often than not.

When to Keep away from Auto ISO
Whereas Auto ISO could be very helpful, it will also be pointless. As an illustration, in the event you’re capturing on a tripod, you’re typically working very slowly and intentionally, and also you need full management over all settings. This can be a scenario when Auto ISO is finest averted.
You additionally could wish to keep away from Auto ISO in conditions the place your topic is in fixed lighting, however the background is altering–similar to when a chook is transferring in entrance of grass, then sand, then sky, and again to grass. Right here, relying in your metering mode and the dimensions of your topic, your digital camera could modify the publicity because the background shifts, however it’s possible you’ll wish to keep a relentless stage of brightness.
That’s if you’ll wish to flip off Auto ISO, and work with Guide mode as an alternative.
Conclusion
Auto ISO is an especially helpful digital camera characteristic, and one that each photographer ought to attempt.
So change your digital camera over to Auto ISO, and begin practising! See what sort of photographs you will get.